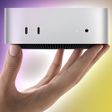
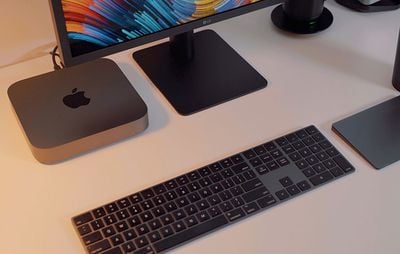
Apple in late October unveiled a refreshed version of the Mac mini, marking the first update to the company's smallest desktop machine in four years.
We managed to get our hands on one of the new Mac mini models, and in our latest video, we unbox it and share our first impressions on the revamped machine.
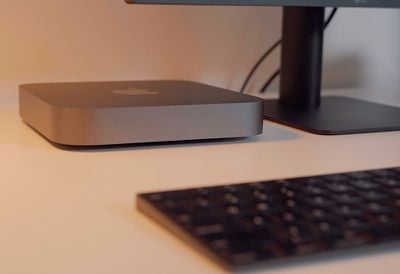
The Mac mini's design hasn't changed, and it's still a 7.7-inch square box that's 1.4 inches thick, but it is available in a new Space Gray color rather than the traditional silver.
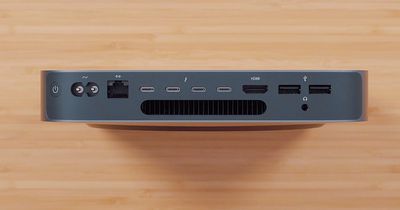
It's otherwise the same, but with the exception of a new selection of ports. The Mac mini is outfitted with four Thunderbolt 3/USB-C ports, two USB-A ports, an HDMI 2.0 port, an Ethernet port, and a 3.5mm headphone jack.
While the design is largely the same, the internals of the Mac mini have been entirely overhauled. There are new, more powerful components, which necessitated a bigger internal fan with twice as much airflow, expanded vents, and a revamped power supply that offers 70 percent more maximum sustained power.
The base Mac mini ships with a 3.6GHz quad-core 8th-generation Intel Core i3 processor, and this is actually the first time that all Mac minis have had at least quad-core processors. A higher-end 3.2GHz 6-core Core i7 processor is also available as an upgrade option.
In our testing of the entry-level Mac mini, it earned a single-core score of 4452 and a multi-core score of 12391. That puts the base model on par with lower-end 13 and 15-inch MacBook Pro models from 2017 and 2018.
All 2018 Mac mini models ship with an included T2 chip, which makes sure all of the data on the SSD is encrypted using dedicated AES hardware, and offers a secure boot to ensure your software isn't tampered with and only OS software trusted by Apple loads at startup.
The Mac mini uses Intel integrated UHD Graphics 630, but with the Thunderbolt 3 ports, it's able to connect to an eGPU for workflows that require more graphics power. Thunderbolt 3 also lets the Mac mini connect to two 4K displays at 60Hz or one 5K display at 60Hz.
8GB of RAM comes standard in the Mac mini, but it can handle up to 64GB, with Apple offering an option to customize the machine with additional RAM when placing an order.
Likewise, the base machine also ships with a 128GB SSD, but it can be upgraded to 2TB of storage in total.
None of these new features in the Mac mini come cheap, and the base level model now starts at $799, up from the $499 starting price of the 2014 model.
Apple sells the Mac mini in two configurations: $799 for 3.6GHz quad-core 8th-generation Intel Core i3 chip, 8GB RAM, Intel UHD Graphics 630, and a 128GB SSD, and $1,099 for a 3.0GHz 6-core 8th-generation Intel core i5 chip, 8GB RAM, Intel UHD Graphics 630, and a 256GB SSD.
Unfortunately, as with many Apple products, the Mac mini is not really user upgradeable. You can upgrade the RAM, but you need to take the entire machine apart, which is tricky. The CPU and SSD, meanwhile, are soldered in place and can't be upgraded after purchase.
What do you think of Apple's new 2018 Mac mini? Was it worth the four-year wait? Let us know in the comments.
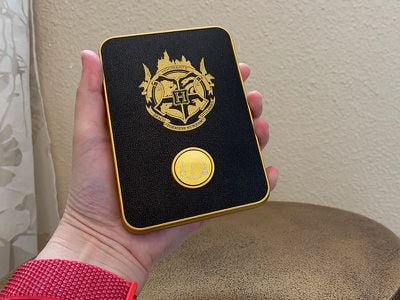
The Harry Potter version of the Lifeprint printer is identical in function to the regular Lifeprint printer options, but it has a unique Harry Potter design and the branding is a clever way to highlight the Lifeprint's augmented reality capabilities.
In the Harry Potter universe, photographs are animated rather than still, something that Lifeprint mimics through an augmented reality app that can play videos or Live Photos in the Lifeprint app when a photo printed with a Lifeprint printer is scanned.
Design
Functionally, the Harry Potter printer is similar in design and shape to the standard Lifeprint printer. Like all Lifeprint printers, it is a ZINK printer which means it uses ZINK paper with no need to bother with printer cartridges and other hassles.
The Harry Potter printer is rectangular in shape and is thicker and wider than an iPhone, but still portable enough to easily tuck into a bag or backpack. It measures in at about 4.7 inches long, just under an inch thick, and three inches wide.
You can get the printer in either black and gold or black and white, with both options decorated with a Hogwarts crest on the front. The crest isn't as ornate as it is in the Harry Potter movies, but it features the four houses, an outline of the castle, and the Hogwarts motto, "Draco Dormiens Nunquam Titillandus" which means Never Tickle a Sleeping Dragon.
The printer itself is made from a gold plastic with a textured top plate where the Hogwarts branding is emblazoned. Below the Hogwarts crest, there's a circular spot where you can add a house crest. The printer ships with four circular crests for Gryffindor, Slytherin, Hufflepuff, and Ravenclaw.
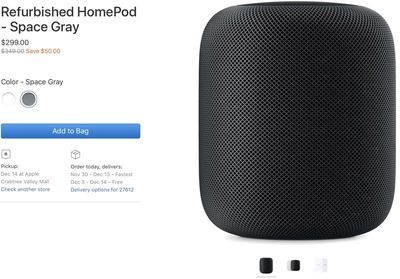
Apple today added the HomePod to its online store for refurbished products in the United States, offering the smart speaker at a discount for the first time.
The HomePod, normally priced at $349, is available in both white and space gray for $299, a $50 discount off of the regular price.
There is no HomePod listing on the main Apple refurbished site as of yet, but it should be added in the near future. For now, the HomePod can be purchased from the individual HomePod refurbished listing. Apple is still rolling out refurbished models, so the page doesn't work on occasion, but will show up with refreshing.
A refurbished HomePod bought today will be delivered between November 30 and December 14, depending on shipping method selected at the time of purchase.
Introduced in February, the HomePod is Apple's Siri-enabled smart speaker that pairs well with Apple Music. It serves as a Home hub, features AirPlay 2 support, can make phone calls, and offers up most of the capabilities of Siri on an iPhone.
Apple's refurbished stock is often limited in quantity and can sell out, which is something to be aware of. Checking the refurbished site often or using a tracking site is the best way to figure out when a particular item that you might want is in stock.
Purchasing a refurbished HomePod from Apple is a good way to get a like-new device at a lower price point. All of Apple's refurbished products are tested, certified, cleaned, and guaranteed with a one-year warranty that can be extended with AppleCare+.
B&H Photo has debuted a new sale this week, discounting the 2018 13-inch MacBook Air by $100 and marking one of the first major discounts for the notebook, which Apple just launched less than one week ago. With the sale, the entry level model of the MacBook Air is now down to $1,099 from $1,199.
Note: MacRumors is an affiliate partner with these vendors. When you click a link and make a purchase, we may receive a small payment, which helps us keep the site running.
Below we've listed each of the SKUs on sale in Space Gray, and you can find the Silver and Gold options on B&H Photo as well. B&H Photo lists these MacBook Air models as pre-orders, so shoppers will likely have to wait a little longer to get the notebook in, but sales tax will not be collected on orders in certain states.
For today only, B&H Photo is also offering Apple's 15-inch MacBook Pro with Touch Bar from Mid 2017 (3.1 GHz, 16GB RAM, 512GB SSD) for $2,199.00, down from $2,999.00. Additionally, the retailer is offering another model of the same notebook (3.1 GHz, 16GB RAM, 2TB SSD) for $2,799.00, down from $4,199.00.
In an exclusive sale, Speck is offering MacRumors readers a 35 percent sitewide discount through tomorrow, November 14. To get access to the sale, enter the promo code RUMORS35 during the checkout process. Discounts can not be stacked, so the code isn't valid on products already marked down on Speck's site.
Speck's website is full of accessories compatible with iPhone XS, XS Max, XR, 8, and 8 Plus, 11-inch and 12.9-inch iPad Pro, MacBook Air, MacBook Pro, and many more. The company also sells laptop bags and power accessories, so be sure to check out the site before the exclusive discount code expires on Wednesday.
Lastly, those looking to round out their Harry Potter iTunes Movies collection -- or complete it in one go -- should check out the latest sale on Apple's digital movies storefront. In the sale, each individual film is marked down to $7.99 and the complete collection bundle is down to $49.99.
Originally, individual movies in the series were around $14.99, and the bundle of all eight films was priced at $79.99, so if you've been waiting to add the series into your iTunes Movies library, now is a great time. Additionally, all eight films are available in 4K Dolby Vision.
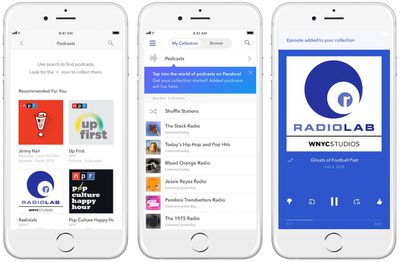
Following its acquisition by SiriusXM in September, Pandora today announced that it will begin offering specialized podcast curation under the Podcast Genome Project. Similar to its Music Genome Project, the PGP will launch in a public beta format and combine human curation with advanced machine learning to offer users specific podcast recommendations, "down to the episodic level."
Pandora says that the Podcast Genome Project will evaluate content based on more than 1,500 attributes like MPAA ratings, timely topics, production style, content type, host profile, and combine this with listener signals like thumb ratings, skips, and replays. Machine learning algorithms, natural language processing, and collaborative filtering methods will also work in tandem with Pandora's in-house curation team to give each user unique podcast recommendations that evolve as their preferences change.
“It might feel like podcasts are ubiquitous, but, eighty-three percent of Americans aren’t yet listening to podcasts on a weekly basis, and a majority of them report that’s because they simply don’t know where to start,” said Roger Lynch, Chief Executive Officer, Pandora. “Making podcasts - both individual episodes and series - easy to discover and simple to experience is how we plan to greatly grow podcast listening while simultaneously creating new and more sustainable ways to monetize them.”
Pandora's podcast partners include PM, Gimlet, HeadGum, Libsyn, Maximum Fun, NPR, Parcast, PRX+PRI, reVolver, Slate, The New York Times, The Ramsey Network, The Ringer, WNYC Studios, and Wondery. The company says that these partners and the amount of podcasts on the platform will continue to grow over time.
Besides podcast listening, Pandora offers online radio streaming to its users, and last year launched "Pandora Premium" as a competitor to Apple Music and Spotify. At $9.99 per month, subscribers can ditch ads, search for and play any song, create playlists, download music for offline listening, and receive unlimited skips and replays.
While Apple Podcasts has been the hub for many users to listen to their favorites shows, more of the company's competitors have begun supporting podcasts as interest in the format grows. In the summer of 2017, a report by Bloomberg claimed that Spotify was planning to "come after" Apple with a strong push into podcasts, and since then it has added NPR's catalog of podcasts and the BBC's shows into the music streaming app.
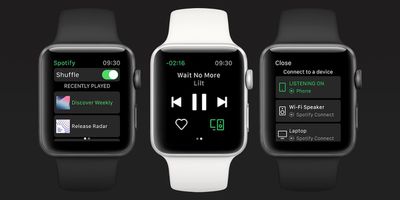
Spotify for the Apple Watch is rolling out to all users over the coming week. Announced by the company today, the release follows a beta version of the app that appeared in early November, and comes well over a year since Spotify hired "Snowy" developer Andrew Chang onto its team to help build the app.
Spotify says the app provides users with useful playback controls and the ability to connect to their music speakers and other devices through Spotify Connect. Like Apple Music on Apple Watch, Spotify subscribers will now be able to hit play, pause, skip, and rewind songs by interacting with their Apple Watch.
We’re constantly on the go—whether bouncing between the gym, work, school, errands, or just chilling—and our smartwatches are the tool to help keep us up to speed. Today, Spotify is introducing a new app for the Apple Watch, giving you the ability to seamlessly access and control your favorite music and podcasts without missing a beat.
Additionally, users will be able to access their recently played songs and favorite the currently playing song by tapping the heart icon on the Apple Watch screen. Down the line, Spotify plans to make music and podcasts available to listen offline on Apple Watch, among other updates it hasn't yet announced.
To get the Spotify app for Apple Watch, the company says that users will need to make sure they have the latest version of the Spotify iOS app (8.4.79), and they should begin seeing the Apple Watch version of the app over the next week.
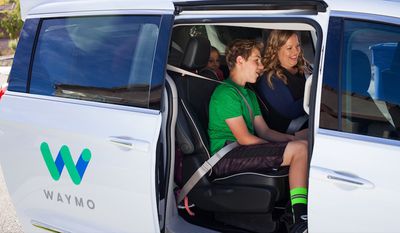
Waymo's commercial driverless car service is set to launch in early December, according to someone familiar with the company's plans (via Bloomberg). The service won't be branded as a "Waymo" platform, however, and will receive a new name and compete directly with car-hailing apps Uber and Lyft.
The launch will be small, with only a couple hundred authorized riders in the suburbs around Phoenix, Arizona and covering about 100 square miles. This is the same tactic that Waymo has used in previous tests, and reports about the upcoming autonomous ride-hailing service being tested in Arizona began appearing one year ago.
It's believed that the first group of customers for the service will be taken from Waymo's Early Rider Program, which is made up of 400 volunteer families who have been using Waymo since the spring of 2017. The families who signed up for that program would be released from their non-disclosure agreements under the new driverless service, and encouraged to share their experiences on social media or even take friends for rides.
The service won't be completely driverless out of the gate, it seems. According to those familiar with the plans, there will be backup drivers in some cars "to help ease customers into the service," and to take over driving if necessary. Based on Waymo's accumulated data, the modified Chrysler Pacifica minivans will still drive themselves more than 99.9 percent of the time.
Over time, Waymo wants to plant the seeds of the driverless car service in different cities across the United States, but it will take some time because the company hopes to avoid bad customer experiences and avoidable crashes that could set it back by years. As for pricing, nothing is certain yet, but Waymo is planning to offer fares that are competitive with Uber and Lyft.
Apple appears to have locked a select group of users out of their Apple ID accounts over the past 20 hours or so, with no clear indication yet as to why the incident has occurred. According to reports on Reddit and Twitter, users are being kicked out of their Apple IDs for security reasons, and forced to reset their password to gain access to their account.
Users report this happening without warning on iPhone, Apple TV, and other Apple devices, while they were using Apple Music, watching TV, etc. The original poster on Reddit confirmed that they have two factor authentication enabled and a unique iCloud password for their Apple ID not used anywhere else, and many users report similar settings.
On Twitter, @AppleSupport is guiding users to the Support Communities web page that explains what to do if your Apple ID is locked and disabled. In nearly all instances across social media, users are reporting that they must reset their Apple ID password to be able to get back into their accounts.
With no official word from Apple and no clear reason behind these forced password resets, it's unclear why some users were affected and what caused Apple to initiate the wave of resets in the first place. We've reached out to Apple for a comment, and will update this article if we hear back.
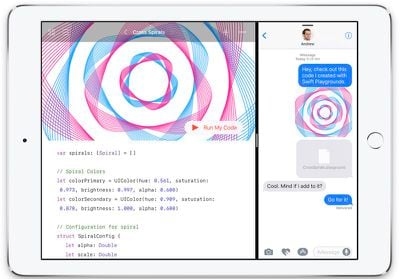
Apple today updated its Swift Playgrounds app for the iPad to version 2.2, introducing a number of improvements.
Third-party content is easier to discover and download within the Swift Playgrounds app, and Apple has made touch gestures for selecting code both more precise and easier to use.
The What's Next feature that's designed to suggest new playgrounds for users to try is now smarter than ever, and the on-screen keyboard has been revamped to show and hide more predictably.
Apple's release notes for the update also say that unspecified bug fixes and performance improvements have been included.
- Third-party content is easy to discover and download for free directly within the app - Touch gestures for selecting code are more precise and easier to use - What's Next is smarter about suggesting new playgrounds for you to try - On-screen keyboard shows and hides more predictably - Additional bug fixes and performance improvements
The Swift Playgrounds app is designed to teach children and adults how to program through a series of entertaining and educational "Learn to Code" lessons.
Swift Playgrounds was last updated in April with the What's Next feature for suggesting new content to explore within the app.
Swift Playgrounds can be downloaded from the App Store for free. [Direct Link]
Fiat Chrysler Automobiles (FCA) is home to a number of vehicle brands, including Dodge, Jeep, Ram, and of course Chrysler and Fiat. All of these brands include FCA's Uconnect infotainment system, the most recent version of which, version 4, began making its way into vehicles for the 2017 and 2018 model years. Vehicles with Uconnect 4 support both CarPlay and Android Auto, and I recently had an opportunity to test out a 2018 Chrysler Pacifica Hybrid Limited equipped with a Uconnect 4C NAV system that includes built-in navigation.
The Pacifica Hybrid is a plug-in hybrid, and really the only such vehicle available in the minivan segment in the United States, so it has a lot going for it in that regard. With a charge that takes just a couple of hours with a 240V level 2 charger or more like 14 hours with a 120V level 1 charger, you get roughly 33 miles of battery-only operation.
Otherwise, the Pacifica acts as a traditional hybrid, supplementing the gas engine and recapturing some energy through regenerative braking to recharge itself. Overall, the Pacifica Hybrid is rated at 84 MPGe (32 MPG in gas-only mode) and offers up to 570 miles of range.
Overview of center stack infotainment system and other controls
Unsurprisingly, my test vehicle was outfitted with lots of bells and whistles, including a 20-speaker Harman Kardon audio system that sounded great and a host of safety features including standard ParkSense sensors to alert of you of obstacles at front and rear, optional parallel and perpendicular parking assist that controls the steering wheel for you, and adaptive cruise control with stop and go support.
You'll also find a lane departure warning with assist feature to help keep you in your lane, blind spot monitoring, rear cross-traffic warnings, collision warning with automatic braking, bird's eye surround view, rain-sensing wipers, and more. KeySense technology recognizes which key is being used to operate the vehicle and lets you customize settings for each driver.
Uconnect
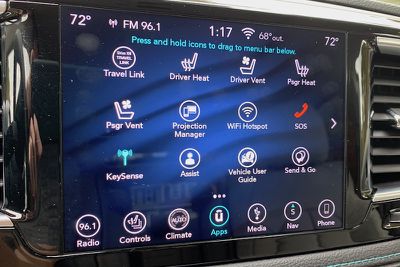
The 2018 Pacifica comes with an 8.4-inch flush-mounted display in the center stack, and it's a bit more square than some other infotainment system displays. As a result, FCA is able to include persistent status and menu bars at the top and bottom of the screen, with the currently active function taking up the majority of the display. The top status bar displays information like temperature settings for driver and passenger, the current radio station, clock, exterior temperature, and Wi-Fi signal if you have the available hotspot functionality activated.
The bottom menu bar is customizable and provides easy access to a variety of functions, and the buttons can update in real-time to show information relative to the specific functionality. For example, the Radio icon will also display the current station, while the Nav icon will show your current compass heading and the Phone icon will show the signal strength of a connected device.
Other buttons control systems such as heated/ventilated seats, heating and air conditioning, connected media devices, and paired phones. An Apps icon gives you access to up to two dozen such sections, and you can press and hold any of them and drag them to the menu bar.
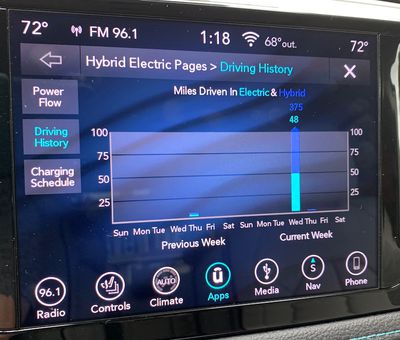
The Pacifica Hybrid even has a Hybrid Electric app that will give you a live view of your power flow as well as your driving history that shows you how far you've driven on electric and gas power over the past two weeks. You can also set your charging schedule in case you want to take advantage of lower electricity rates at night, for example.
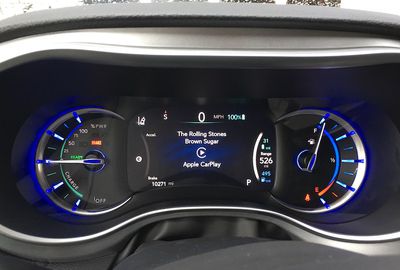
Overall, the 8.4-inch display is bright and clear, although its glossy finish does tend to attract fingerprints. A supplemental 7-inch driver information display can be configured to show information like audio track, turn-by-turn directions, and more.
Driver display with audio information
Built-in Navigation
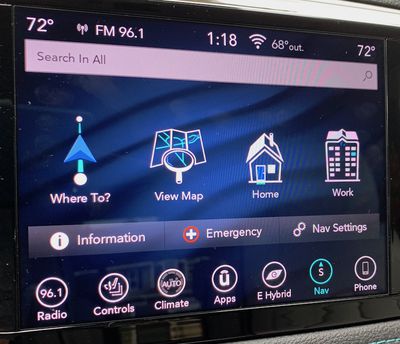
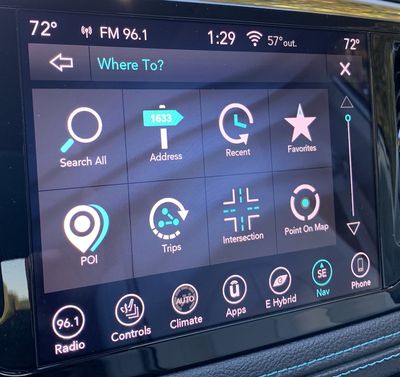
I came away impressed with Uconnect's navigation capabilities. It all starts with the initial menu screen you see when you launch the navigation app, which offers immediate access to address/POI search, a direct map view, and quick-access directions to home or work, once those are configured. There's also easy access to directions to emergency services like hospitals, which can be an important lifesaver in an unfamiliar area.
From there, it's one more tap into a menu that offers a number of other options for finding your destination, including search, exact address, lists of recent and favorite destinations, POIs, and more. Of course, voice is the easiest way to input a destination, and I found the built-in voice assistant very good at recognizing my spoken destinations and interpreting them correctly.
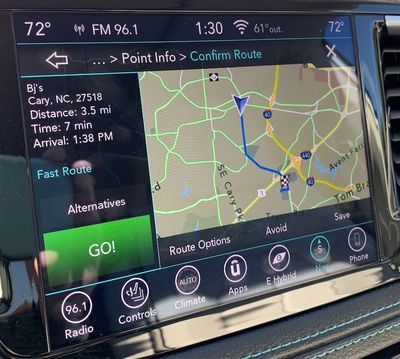
Once a destination is found and a route plotted, Uconnect's navigation system offers an overview of the route and the ability to change certain options if you want to optimize things, and then you're off and running.
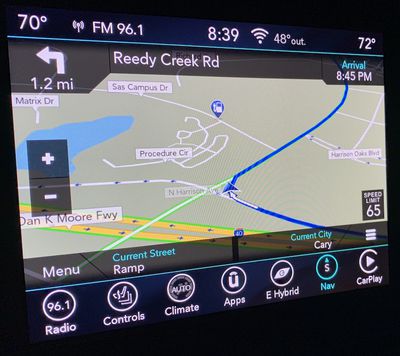
During navigation, the Uconnect system offers an information-rich display that includes all of the usual metrics such as a map with large zoom buttons, current speed limit, upcoming maneuvers, and arrival time, as well as your current street and city. Voice guidance is accurate, timely, and natural-sounding.
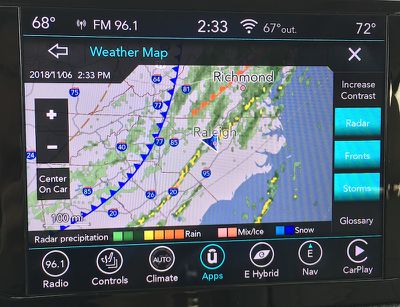
Complementing the built-in navigation is support for SiriusXM Travel Link, a subscription service that offers data such as weather, nearby fuel prices and movie listings, sports scores, and stock prices. A five-year subscription to Travel Link is included with the Pacifica.
SiriusXM Travel Link weather map
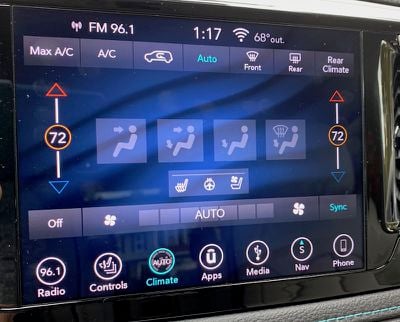
Climate Control
In an age of increasingly complex and multi-purpose infotainment systems, there's been considerable controversy over whether basic functions like climate controls should be incorporated into them. While infotainment systems are powerful and convenient, their touchscreen nature is more difficult to navigate by feel than hardware knobs and buttons, and many have advocated for keeping climate controls, which generally have a limited number of options and are frequently adjusted, as physical controls rather than on-screen ones.
Main climate controls
Chrysler has tried to split the difference in the Pacifica, offering both hardware and on-screen controls. The physical knob and buttons make it easy to adjust the mode, temperature set points, fan speed, and defrosters nearly by feel. Those are going to be your most frequently adjusted options on a climate control system, so it makes sense to make them easy to adjust.
Hardware climate controls below the Uconnect display
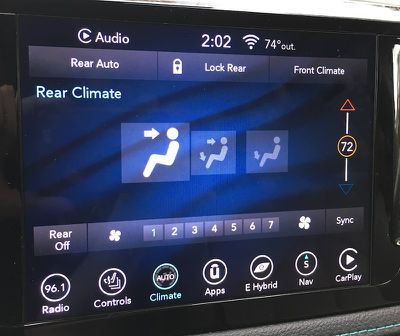
All of these functions are, however, also available through the Uconnect system, which even offers a few more options. For example, if you want to sync the driver and passenger temperature settings or control the rear climate system, you'll need to dive into the Uconnect system. But even when you do, the most commonly used functions come with large icons that are easy to tap.
Rear climate controls
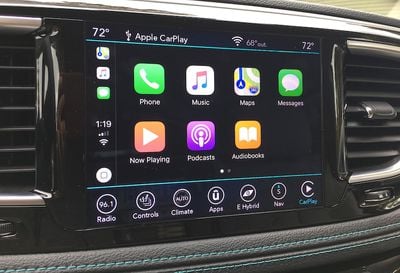
CarPlay
When you plug your iPhone into the specified USB port on the dashboard, you'll go through the usual process of granting access for CarPlay, at which point the standard CarPlay home screen will pop up on the Uconnect display. You'll quickly notice that in addition to CarPlay, the Uconnect status and menu bars remain visible at the top and bottom of the display.
This is a fantastic way to integrate CarPlay into the native infotainment system, as it makes it incredibly easy to hop in and out of CarPlay as needed. The Phone icon in the menu bar even automatically changes to a CarPlay button when you plug in your phone.
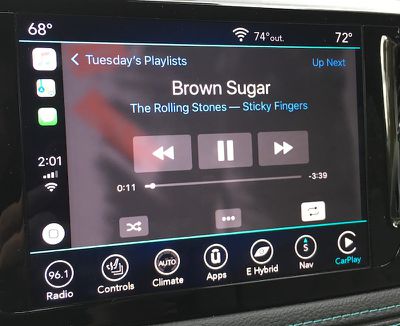
CarPlay's "Now Playing" screen
On some all-touchscreen infotainment systems, CarPlay takes over the entire display, which can make it a bit difficult to get back to the vehicle's own system unless you use voice commands or there's a dedicated hardware button to take you back to the native home screen. CarPlay's built-in solution is to have an "app" on its home screen for the car manufacturer, and selecting that icon will take you back to the native system. Other infotainment systems use a widescreen display that's able to show some information from the native system alongside CarPlay.
But with Uconnect, you never really leave the Uconnect system, even when CarPlay is running. You can always access the various Uconnect functions using the menu bar at the bottom, and just as easily get back to CarPlay. There isn't even a Chrysler icon on the CarPlay home screen, because you simply don't need it.
Google Maps in CarPlay
If you prefer to operate CarPlay on the Pacifica without using the touchscreen, you can use the hardware Browse/Enter knob below the display to scroll through the interface and select items, but it's much clunkier than direct touch manipulation and the knob is on the far side of the center stack from the driver.
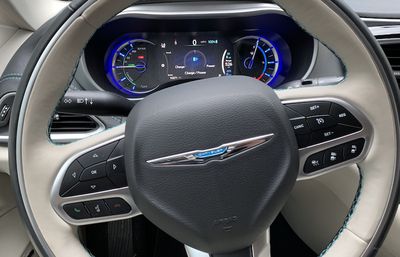
CarPlay can also be controlled via Siri, and as with most other car manufacturers, Chrysler has opted for a dual-duty voice button on the steering wheel. A short press activates the built-in Uconnect voice assistant, while a long press brings up Siri.
Phone/voice/Siri buttons at lower left of steering wheel
Overall, the Pacifica has quite a few steering wheel controls, which can be helpful once you learn the locations of all of them. Buttons on the front of the wheel are dedicated to cruise control, phone/voice assistant controls, and configuration controls for the driver display. Additional rocker-type switches are located on the back of the steering wheel, with the left switch used for changing radio stations and audio tracks and the right switch used for volume control and changing audio modes.
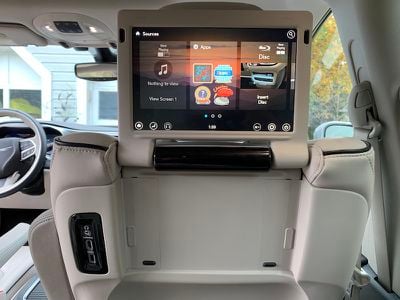
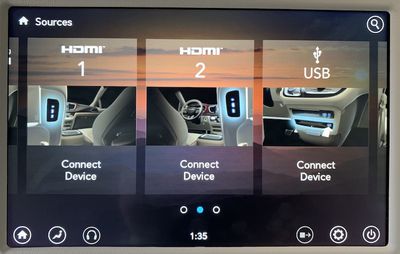
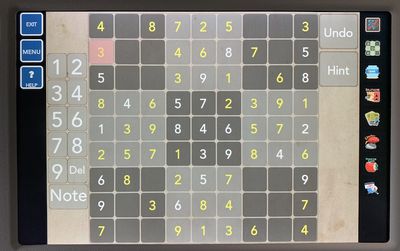
Uconnect Theater
My test Pacifica came with Uconnect Theater, which includes dual 10.1-inch HD touchscreens on the front seatbacks, as well as a connected Blu-ray player up front and HDMI input, headphones, and remotes for each of the rear screens.
With various options for accessing videos, music, and even built-in games on Uconnect Theater, the kids can stay entertained on those long road trips. Miracast wireless streaming is also available from compatible devices, although that doesn't include iOS devices.
The two screens can operate independently or together, and inputs for one screen can be displayed on the other screen. Several of the included games like checkers and tic-tac-toe also support two-player gaming.
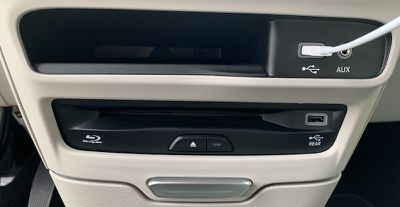
Ports
The Pacifica Hybrid is loaded with charging ports, as you might expect with a premium trim minivan. The center stack contains two USB ports, one next to an Aux port for connecting to the main Uconnect audio system and CarPlay, and a second one just below next to the Blu-ray player that can deliver content to the Uconnect Theater system.
Center stack Blu-ray player and USB ports for main and rear
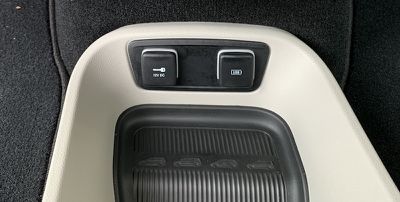
A third front USB port is located near the floor up front next to a 12V port.
USB and 12V ports adjacent to floor storage between center stack and console
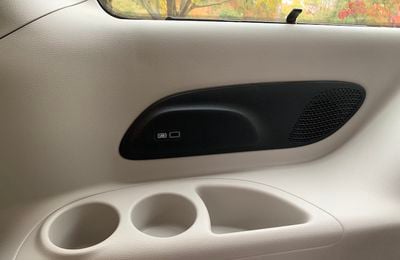
There's an additional USB port (and an HDMI port) located on each front seatback as part of the Uconnect Theater system, offering convenient charging for second-row passengers. And for those relegated to the third row, this model was equipped with one more USB port along the right side. For other power needs, there's another 12V port in the far rear of the minivan for tailgating and other situations, as well as a traditional 115V outlet tucked away on the right wall behind the second-row seats and the sliding door.
Third-row USB port
Wrap-up
I came away from the Pacifica Hybrid with a quite positive impression of the Uconnect infotainment system. It ticks most of the boxes when it comes to functionality and ease of use. The built-in navigation system worked well, and Uconnect offers a host of controls. The sheer number of control options in Uconnect can feel a bit overwhelming at times, but the ability to customize the bottom menu bar with your most frequently needed functions helps to streamline things.
Integration with CarPlay is excellent, and while I've typically appreciated widescreen displays that can share native infotainment content alongside CarPlay, FCA has shown me an excellent alternative in Uconnect with the persistent menu and status bars. The setup really does make it feel like Uconnect and CarPlay are working together rather than two completely different modes.
CarPlay is available on all Chrysler Pacifica trims, both regular and hybrid. Lower-tier non-hybrid models (L, LX, Touring Plus, and Touring L) all come with a 7-inch touchscreen Uconnect 4 system, while the larger 8.4-inch display comes standard on the Touring L Plus and Limited trims and is available as a package option on the Touring L. All three hybrid trims (Touring Plus, Touring L, and Limited) have at least the larger 8.4-inch system standard, with the navigation version standard on Limited.
Uconnect Theater, which is great for long road trips for the kids, is standard on the Touring L Plus and Hybrid Limited trims, and it's an option on the regular Limited trim.
The 2018 Pacifica Hybrid starts at $39,995 for the base Touring Plus trim, and CarPlay support comes standard. Higher-end Touring L and Limited trims are also available with upgraded options, and the Pacifica Hybrid currently qualifies for a $7,500 federal tax credit to help bring down the cost of eco-friendly vehicles. Non-hybrid Pacifica models start at $26,995. New 2019 models at similar prices and trim levels are also now starting to hit dealerships.
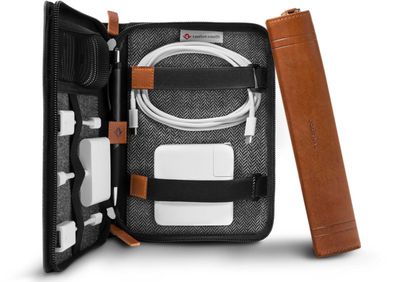
Twelve South today announced new additions to its Journal line of products, including Journal options for MacBook Air and MacBook Pro and a new Journal CaddySack for storing accessories.
The MacBook Journal, priced at $149.99, is designed to work with 13 and 15-inch MacBook Pro models and the new 13-inch Retina MacBook Air.
We had a chance to check out the Journal for MacBook ahead of its launch. It features rich, soft leather in a cognac color that will take on a unique patina as it ages, and the exterior, as the name suggests, looks like a journal complete with spine.
The leather exterior is accompanied by a soft black microsuede interior that keeps your MacBook from getting scratched and offers some light padding. When expanded, the bottom of the MacBook sits on top of the bottom of the Journal, while the top is held in place by two pieces of elastic.
Inside, at the bottom of the Journal case, there's a hidden interior pocket where you can keep documents safe. The entire Journal features a zipper closure with dual zippers so it won't come out during transport.
Twelve South is also introducing the Journal CaddySack, an alternative to the BookBook CaddySack it already offers. Priced at $90, the Journal CaddySack is designed to match the Journal for MacBook and the Journal for iPhone.
It too is made from a supple cognac leather that will develop a one-of-a-kind look over time, with an attractive gray tweed interior.
Several elastic and velcro straps inside of the CaddySack can hold a MacBook power adapter, charging cables, dongles, an Apple Pencil, and other accessories. There's also a zippered pocket at the top for other small odds and ends.
All of the straps inside of the CaddySack are adjustable, which gives you flexibility when deciding what you need to carry inside for day to day use. Like other Journal products, the CaddySack zips closed to protect everything located inside.
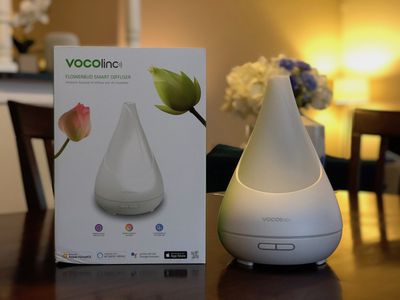
Apple's HomeKit platform has expanded to support a variety of device categories since its launch in 2014, now including lights, thermostats, ceiling fans, sprinklers, outlets, and humidifiers.
Although close in style to humidifiers, one specific accessory missing from HomeKit has been an essential oil diffuser, and now connected smart home brand Vocolinc has introduced the FlowerBud Smart Diffuser to rectify the situation.
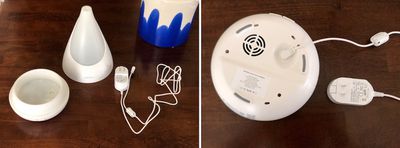
Setup
Out of the box, the FlowerBud Smart Diffuser looks somewhat similar to other essential oil diffusers, and it's broken into two parts for quick-and-easy assembly. There's a 6.5-inch wide base that holds the water reservoir, and on its front there is a button for the mood light and one for the diffuser itself.
The water reservoir holds 300 ml of water, but you'll have to make two passes with the included measuring cup to fill the base to capacity, since it only holds about 150 ml. Underneath, you'll find a port to connect the AC adapter's barrel plug into, and the slightly elevated rubber feet make everything level even with the cord passing through.
Lyft today revealed that a loyalty program for its customers, "Lyft Rewards," will begin rolling out for select passengers in December, allowing these users to be rewarded for using the service.
The program will work by tracking each time you use Lyft to get around, netting you points for every dollar that you spend on the ride-hailing service. With enough points, you'll earn rewards like an upgrade to Lyft Lux or discounts on a future ride. In the app, Lyft will show you how close you are to your next reward.
The company says that it will continue to work on Lyft Rewards over time, and is brainstorming future additions to the service, including reward perks like ride upgrades, access to more experienced rivers, and double points days.
Following the December 2018 rollout for select riders in various cities, Lyft Rewards will be available to more riders in the new year. The company says it will begin sending out email notifications to those eligible for the December phase of the program sometime soon.
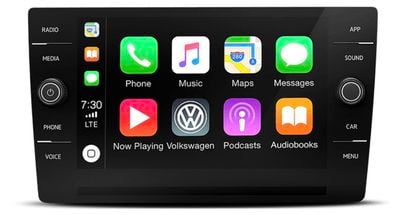
Volkswagen today announced that subscribers of its Car-Net service can now use the iOS app and Siri to lock and unlock their car. The Siri command for this will be, "Hey Siri, lock my car."
With the feature, Volkswagen owners can also start and stop a charging session for electric cars, set a specific temperature in the car, locate the car, turn on the defroster, check estimated mileage, check charge levels, and enable the honk and flash alarm commands.
The company also confirmed that Car-Net supports Apple's new Siri Shortcuts app, allowing drivers to set personalized phrases that activate these Volkswagen connected car abilities alongside other smart home commands.
“We are constantly looking at innovative ways to make VW Car-Net more convenient and relevant for our customers,” said Abdallah Shanti, EVP, Global Chief Information Officer Volkswagen Brand & Car-IT. “With Siri Shortcuts, creating voice commands to use with our mobile app was a great opportunity to do just that! Integration with Siri helps our drivers keep eyes on the road and hands on the wheel.”
Siri Shortcuts debuted in iOS 12 this past September, allowing users to create complex commands that tie together numerous apps, services, and smart home devices into one speakable phrase. To get the update for the VW Car-Net app, you'll need iOS 12 or later on iPhone [Direct Link].
Noted analyst Ming-Chi Kuo has issued a new research note today, cutting his shipment estimates for the iPhone XR due to several factors. He believes that some of the decline will be offset by higher demand for iPhone XS and older "legacy" models, but he is still reducing his overall iPhone shipment forecasts by 15–20 percent for the first quarter of 2019.
We have reduced our iPhone XR shipment estimation from 100mn units to 70mn during the new product lifecycle (4Q18–3Q19) for the following reasons: 1) Negative impacts on consumer confidence from the trade war, especially in the Chinese market, 2) expectations from more users for more affordable XR or the dual-camera and narrower bezel design to be provided at the current price level, and 3) competition from Huawei's Mate 20 series. We have reduced our XR shipment estimations for 4Q18, 1Q19, and 2Q19 by 30–35%, 25–30%, and 25–30% to 30–35, 20–25, and 10–15mn units, respectively.
Kuo believes that iPhone shipments for the current quarter will be in the same 75–80 million range he previously predicted, while he has lowered his first-quarter estimate to 47–52 million from a previous range of 55–60 million.
Kuo's prediction is somewhat curious given that he raised his early iPhone XR estimate a little less than a month ago and cited stronger demand than seen for the iPhone 8 last year with the potential for more stable demand over time.
Apple's stock price is down over 4 percent today, outpacing broader market declines and falling to its lowest point since the end of July.
Apple analyst Ming-Chi Kuo published a new report over the weekend, related to the introduction of new antenna technology that could be coming in next year's iPhone lineup. According to the analyst, Modified PI (MPI) will replace Liquid Crystal Polymer (LCP) to become the mainstream antenna technology for the 2019 iPhones, but LCP will still be found in the smartphones.
Kuo says that complicated production processes of LCP and Apple's lower bargaining power against LCP material suppliers will contribute to this change. LCP is also said to be more brittle and as such unfavorable for module production yield rate, so improving these rates has the chance to lower the antenna's performance based on current technology limitations.
In total, Kuo believes that there will be a mix of LCP and MPI antennae in the upcoming 6.5-inch, 5.8-inch, and 6.1-inch iPhone models for 2019: four MPI antennae and two LCP antennae. Currently, the iPhone XS, XS Max, and XR are equipped with six LCP antennae. With the switch, LCP shipments for the new iPhones in 2019 will decrease by at least 70 percent year-on-year.
As we enter the era of 5G, Kuo estimates that both MPI and LCP "will coexist" during the transition to the new wireless communications standard. While the market is reportedly confident that the coming 5G era will boost LCP materials growth, Kuo says this expectation may be corrected because many mid-range and low-end smartphones will likely switch to MPI antennae during the transition from 4G to 5G.
Besides antennae, current rumors for the 2019 iPhones again predict three models will launch next year: two OLED models (5.8-inch and 6.5-inch) and one LCD model (6.1-inch). Kuo has previously predicted that the 2019 iPhones will feature a new flood illuminator that will improve Face ID by lowering the impact of the invisible light from the environment, and the notch on these models could be smaller as Apple may combine the front-facing camera and the Face ID sensors.
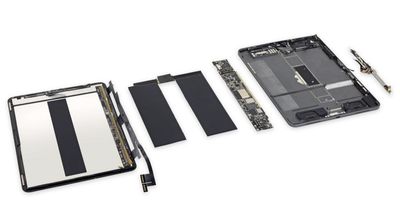
Following teardowns of the new MacBook Air and Mac mini, the repair experts at iFixit have today published their teardown of the 11-inch iPad Pro.
Images via iFixit
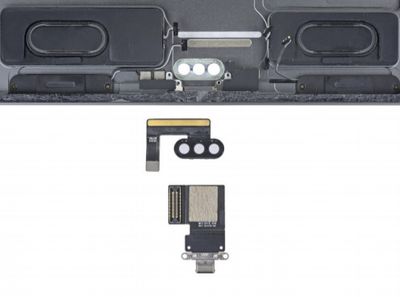
To start, iFixit removed the display from the tablet and the first thing they noticed were the audio components of the new iPad Pro, made up of four woofers and four tweeters.
The speakers and logic board cover impeded access to the iPad Pro's A12X Bionic chip, but eventually iFixit accessed the full logic board. On it, they found the A12X Bionic SoC, 64GB Toshiba flash storage, two Micron RAM totaling 4GB, the NFC controller, Apple's Wi-Fi/Bluetooth module, two Broadcom touch screen controllers, and a Texas Instruments power controller.
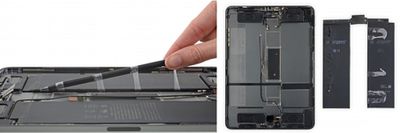
With its sights set on the iPad Pro's battery, iFixit discovered that the 2018 tablet's battery is slightly more repairable than the previous generation. This is because Apple is again using stretch-release battery tabs again with the 11-inch iPad Pro, with six U-shaped strips in total. iFixit explained that each of these strips include two tabs, so fixers have a second chance at repairability should one of them break.
After this smooth opening with the adhesive strips, iFixit still faced a large amount of adhesive running down the left side of the battery. Eventually, the repair experts got the battery free and found a 7,812 mAh battery running at 3.77 V for 29.45 Wh, which is a slight downgrade in comparison to the 30.8 Wh pack of the 10.5-inch iPad Pro.
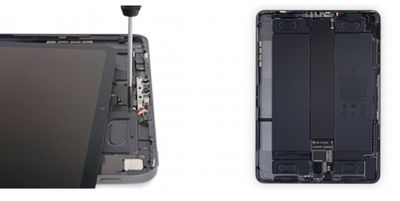
Looking at the Face ID components, iFixit pointed out that this is the same basic hardware previously seen in Apple devices since the iPhone X, just in "a slightly modified form factor." iFixit then removed the speakers, Apple Pencil charging board, and USB-C port, which is fully modular, unlike previous iPads. Unlike the Lightning ports on the older iPad models -- which were soldered to the logic board -- the USB-C port on the 11-inch iPad Pro can be replaced independently of the main logic board.
Lastly, iFixit used its ultrasonic blade to teardown the new Apple Pencil and discover its battery, wireless charging coil, alignment magnets, and Broadcom touch controller. The experts also noticed what looked like a capacitive grid, thought to be used to register the user's tap inputs on the new Apple Pencil. According to iFixit, this particular grid also helps the Apple Pencil know where on the Pencil you tap, not just when, so the experts wondered if more complex gestures could be coming.
Overall, the 11-inch iPad Pro has received a 3/10 repairability score, with 10 being the easiest to repair. The major bonuses for the new iPad Pro's repairability were the modular USB-C port and lack of a physical home button, which "eliminated a common failure point" and could further simplify repairs. Still, iFixit noted that adhesive was nearly everywhere inside of the iPad Pro, and will make all repairs more difficult.
Apple today announced a new display replacement program for the iPhone X, which will see the company replacing iPhone X displays that exhibit touch issues.
According to Apple, some iPhone X displays can experience problems with responsiveness due to a display module component that can fail. Affected devices have a display or part of a display that does not respond to touch or responds intermittently, or a display that reacts without being touched at all.
Apple says that customers experiencing this issue can get a replacement display module from an Apple retail store or Apple Authorized Service Provider at no cost.
There is no serial number check nor specific time period that outlines when affected devices were sold, so presumably this display component failure can impact any iPhone X device. Complaints about ghost touches and displays that fail to respond to touch have been circulating on the MacRumors forums for several months now, dating back to when the iPhone X was first released.
iPhone X users with a display that has these symptoms should visit an Apple retail store location, find an Apple Authorized Service Provider, or contact Apple Support to arrange mail-in service to get a replacement.
Apple recommends customers back up their iPhones to iTunes or iCloud before pursuing repair, and the company warns that other damage, such as a cracked screen, may need to be addressed before the display repair can be completed.
This Apple program does not extend the standard warranty coverage of the iPhone X, and repairs may be restricted or limited to the original country of purchase. The program covers affected iPhone X devices for three years after the first retail sale of the unit.
Apple says that if customers affected by this issue already paid for a repair, they can contact Apple Support for a refund.


 Note: MacRumors is an affiliate partner with these vendors. When you click a link and make a purchase, we may receive a small payment, which helps us keep the site running.


 Apple analyst Ming-Chi Kuo published a new report over the weekend, related to the introduction of new antenna technology that could be coming in next year's iPhone lineup. According to the analyst, Modified PI (MPI) will replace Liquid Crystal Polymer (LCP) to become the mainstream antenna technology for the 2019 iPhones, but LCP will still be found in the smartphones.