

Apple originally debuted Live Photos for iPhones in 2015, touting them as an enhanced mode of photography that lets you take pictures which move when you press on them. Since then, Live Photos have become a standard feature available on iPhones and most iPads, and Apple has added some extra tricks in successive versions of iOS.


Basically, a Live Photo is a combination of a video clip and a still image that results in something akin to an animated GIF when long pressed. With the feature enabled, your iPhone or iPad grabs up to 1.5 seconds of video before and up to 1.5 seconds of video after you tap the shutter button.
Live Photos are made possible thanks to a background feature built into Apple's camera app, which automatically starts recording the moment you open it on your device. After you tap the shutter button with Live Photos on, the app saves only the 1.5 seconds beforehand and discards the rest.
That means, if you open your camera app and leave it open for a few minutes, your device will be recording video the whole time. However, once you tap that shutter button, everything recorded prior to 1.5 seconds beforehand will be deleted.
This guide will help you make the most of Live Photos by showing you what you can do with them. You can click the links below to jump to the sections that most interest you.
- How to take a Live Photo
- How to get the best Live Photo shot
- How to edit Live Photos
- How to change the key image in a Live Photo
- How to save a Live Photo as a video
- How to merge several Live Photos as a video
- How to add a Live Photo to your Lock Screen
- How to share Live Photos
- How to view Live Photos on different devices
- How to view Live Photos on a Mac
How to Take a Live Photo
Live Photos can be taken on iPhone 6s and later, iPad (5th generation) or later, iPad Air (3rd generation), iPad mini (5th generation), iPad Pro (all models), and iPod touch (7th generation). The Live Photo feature may be on or off by default; you can control it by following the steps below.
- Open the Camera app on your iPhone or iPad.
- Tap the Live Photos icon (it looks like a set of concentric circles).

- You will know when Live Photos is on when the icon is highlighted in yellow.
- The word "Live" will also appear at the top of the screen. This label will remain on until 1.5 seconds after you tap the shutter button. It signifies that the video recording is complete.
On iPhone 11 and iPhone 11 Pro models, the Camera app has an additional Live Auto option that lets the phone decide whether a shot has enough action either side of it to warrant taking a Live Photo. You can find it by swiping up from the bottom of the viewfinder.
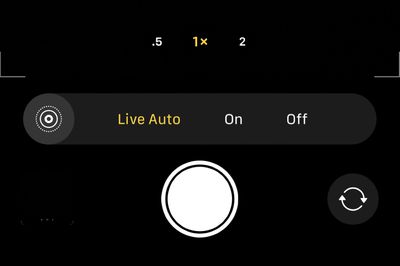
Live Photos are automatically stored in the Photos app, just like traditional photos. However, when you long press or 3D Touch on the screen, they come to life.
How to Get the Best Live Photo Shot
Keep in mind when taking a Live Photo that the camera is already recording beforehand, so you don't want to jerk your iPhone or iPad around right before taking a picture. Instead, make sure you have a steady hand just before taking the shot, and don't immediately put your device down immediately afterward, either – the camera will be recording for just a couple more seconds.
The Camera app automatically senses if the device is being raised or lowered during the 1.5 seconds of video before or after a Live Photo is taken, and omits any video taken during that time. The feature results in potentially shorter Live Photo videos, but keeps the final product looking good by not including blurry footage taken by a device in motion.
Live Photos also record audio, so keep that in mind when trying to grab a candid shot of your friends having drinks. Their conversation will be heard in the Live Photo, and all but three seconds of it will be cut off.
How to Edit Live Photos
In iOS 13 and later, Live Photos can be edited on your iPhone or iPad just like any other photo.
- Launch the Photos app.
- Tap the Live Photo that you want to edit.
- Tap the Edit button, then make your adjustments.
- When you're finished, tap Done.
How to Change the Key Image in a Live Photo
If you take a Live Photo and the still image is blurry, you can open it up and see if other frames you captured are clearer. Then you can choose a new "key photo" – aka the main photo that you see in your camera roll. Here's how.

- Open up the Photos app on your iPhone or iPad.
- Choose a Live Photo.
- Tap Edit in the upper right hand corner of the display.
- Using the photo navigation bar at the bottom of the image, tap the thumbnails to browse through the frames captured for the Live Photo.
- If you find a better still, tap Make Key Photo to select it.
- If you like your original still image best, tap Cancel to exit out of the editing interface.
Once you've selected a new frame and tapped Make Key Photo, the new still image selected from the photo will be the main image that you see in your camera roll and the image that's sent if you share the photo with someone else.
How to Save a Live Photo as a Video
Apple recently added the facility to save a Live Photo as a standard video, which is useful if a Live Photo doesn't do justice to your captured clip. It's also handy if you want to share your Live Photo over a service or platform that doesn't natively support Live Photos. Here's how it's done.
- Launch the Photos app on your iPhone or iPad.
- Tap a Live Photo.

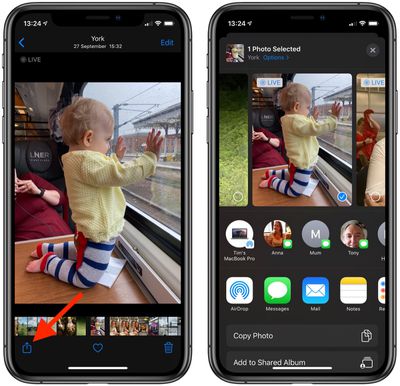
- Tap the Share icon (the square with an arrow pointing out).
- Tap Save Video.
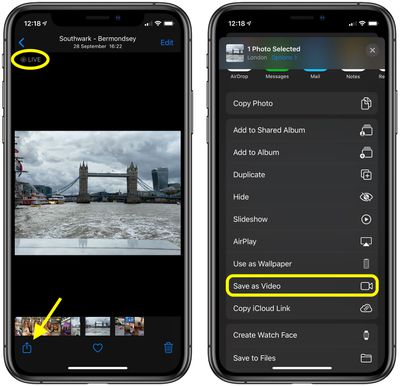
The video clip will be automatically saved to your Photo library.
How to Merge Multiple Live Photos into a Video
If you take several Live Photos in succession, you might decide that they'd work better as one continuous video. Or maybe you'd just like to combine various Live Photos into one long clip for easier sharing. Either way, it's a simple procedure, as the following steps show.
- Launch the Photos app on your iPhone or iPad.
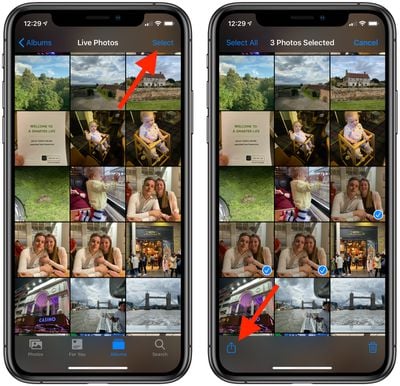
- View your photos, then tap Select in the top-right corner of the screen.
- Tap several Live Photos so that a blue tick appears in the corner of each thumbnail.
- Tap the Share icon (the square with an arrow pointing out).
- Tap Save as Video.
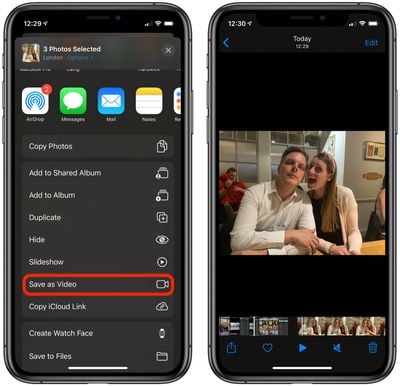
The selected Live Photos will be automatically saved to your Photo library as a single continuous video clip.
How to Add a Live Photo to the Lock Screen
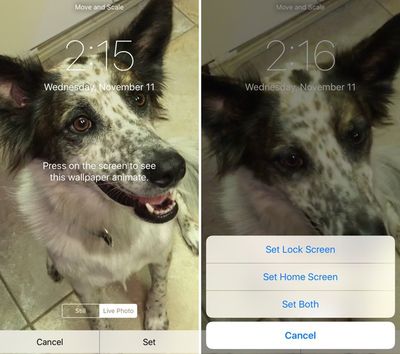
You can set a Live Photo as your Lock Screen wallpaper, and use a long press or 3D Touch to activate it at any time. You can add one just as you would add a traditional wallpaper, but with a couple of added steps.
- Open the Settings app on your iPhone or iPad and select Wallpaper from the list.
- Tap All Photos to choose a Live Photo that you've created.
- Select the Live Photo you wish to use and select Set as Lock Screen.
- When prompted, you can choose to set the image as a still, perspective, or Live Photo. Select Live Photo.
- When prompted to set the image as your Lock Screen, Home Screen, or both, select Lock Screen. (The animation of the Live Photo only works on the Lock Screen.)
How to Share Live Photos
You can share your Live Photos with anyone that owns a compatible iPhone or iPad. Live Photos are also supported on Macs running OS X El Capitan and later.
Sharing Live Photos is similar to sharing traditional ones. Tap on the Live Photo to select it and then tap the Share icon (the square with an arrow pointing out of it). Then select the method for sharing, such as Messages or AirDrop.
Live Photos are not supported on non-Apple services like Twitter and Facebook, but you can always save them as a video and then share them that way.
How to View Live Photos on Different Devices
Live Photos were introduced with the iPhone 6s and iPhone 6s Plus, which were the first devices to sport 3D Touch. Recently, Apple began phasing out 3D Touch in its smartphones, replacing the feature with Haptic Touch. This means activating a Live Photo on newer iPhones is similar to doing so on an iPad – instead of hard-pressing the screen, simply touch and hold the screen while the video plays. Keep your finger on the screen for the duration of the video.
How to View Live Photos on a Mac
Live Photos can only be viewed in Apple's Photos app on Mac computers running OS X El Capitan and later.

If you receive a Live Photo through AirDrop or something, you first need to import it to the Photos app on Mac to view it. The Live Photo will automatically play when you click on it.
Tim Hardwick contributed to this article.







































Top Rated Comments
Clearly you are the master of computers and are smarter than the engineers at Apple.
that's obviously wrong. it would be an awful software design if it was storing Gbytes of useless data.
it just uses a cyclic buffer whose size is 1.5s. at any point in time, the frame prior to 1.5s gets replaced by the current frame.