This article explains how to erase (or format) the built-in startup disk of a Mac with Apple silicon. Note that erasing your Mac permanently deletes all files on it, so follow the backup advice carefully. If you plan to give away, sell, or trade in a Mac, erasing your Mac should be the final step.

First, Back Up Your Data
Before you do anything, you should back up the files on your Mac. You could do this manually by copying across files onto an external drive. If you use iCloud, your photos, mail, contacts, documents, and so on should be automatically backed up in cloud storage.
 However, we highly recommend that you take the time to perform a Time Machine backup of your system using an external drive. That way, the same backup volume can be used by Apple's Migration Assistant during a macOS installation to quickly transfer your applications, files and settings from the old Mac to a new one.
Check out our dedicated guide on how to back up your Mac using Time Machine.
Unlink your Apps
There are certain apps that will need to be manually unlinked from your Mac before you say goodbye to it. Some third-party apps require licenses that only work on a limited number of computers, so think about any licenses you may have purchased.
![]()
Similarly, you should de-authorize your iTunes account on the Mac, as this removes its access to content that you bought from the iTunes Store, iBooks Store, or App Store, including things like music, movies, TV shows, apps, and books.
To learn how to de-authorize your iTunes account, check out our dedicated guide.
Sign Out of iCloud
It's also important to disable Find My Mac and sign out of iCloud in macOS. That way you'll know for sure there isn't anything lingering on your Mac that links your Apple ID to this machine. The following steps show you how.
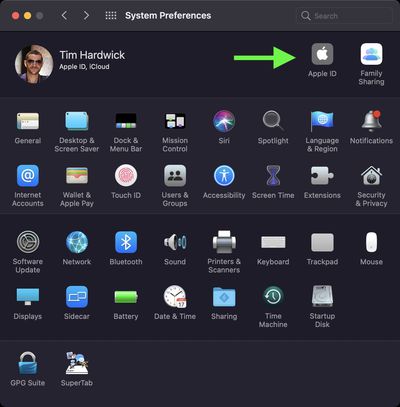
- Click the Apple () symbol in the top left corner of your Mac's screen and select System Preferences....

- Click Apple ID in the preference pane.
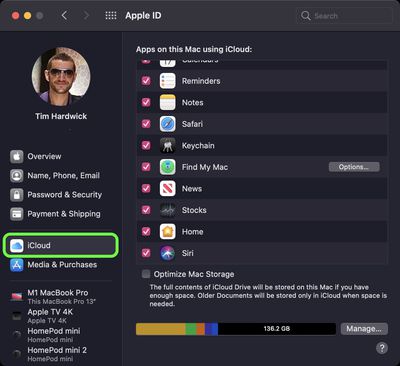
- Select iCloud in the sidebar, then uncheck all the boxes in the list to remove copies of the related data on this Mac.
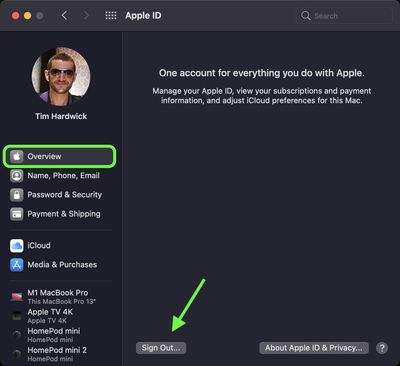
- Select Overview in the sidebar, then click Sign Out... to sign out of iCloud completely.
How to Erase Your Apple Silicon Mac
Note that the following steps will cause Bluetooth devices to disconnect from your Mac, so connect your Bluetooth keyboard, mouse, or trackpad with a USB cable if possible.
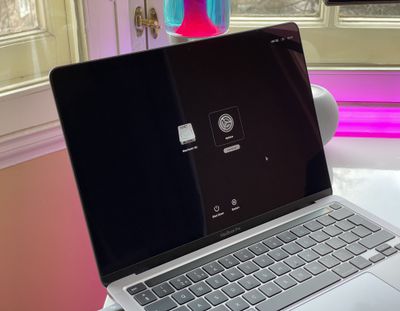
- If your Mac is turned on, power it off by clicking the Apple symbol () in the top-left corner of the menu bar and selecting Shut Down... -> Shut Down. To start up again in macOS Recovery, turn on your Mac and continue to press and hold the power button until you see the startup options window.
- Select Options, then click Continue.
- If prompted, select a user, then click Next and enter the password.
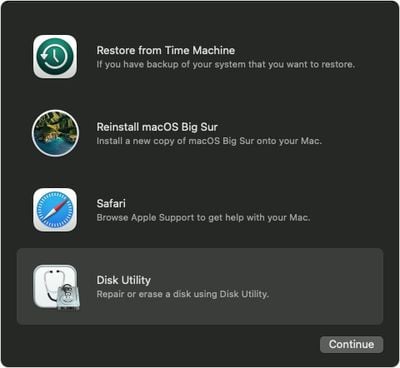
- From the utilities window, select Disk Utility and click Continue.
- Under the "Internal" section of the Disk Utility sidebar, make sure that you see the volume called Macintosh HD. If you don't see it there and you didn't change the name of the system disk yourself, choose Apple menu > Shut Down, then unplug all nonessential devices from your Mac and try again.
- If you previously used Disk Utility to create internal volumes on Macintosh HD, select each additional internal volume in the sidebar, then click the delete volume (–) button in the toolbar to delete that volume.
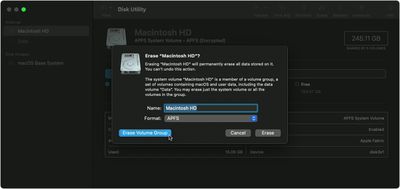
- Select Macintosh HD in the sidebar.
- Click the Erase button in the toolbar, then choose another name if desired and format the disk as APFS.
- Click Erase Volume Group.
- Enter your Apple ID if prompted to do so.
- Click Erase Mac and Restart to confirm the action.

If you're parting ways with your Mac, you're all done. If you're holding on to it and want to start anew, follow the onscreen instructions when your Mac restarts to choose your language. Your Mac will attempt to activate using an internet connection. You can select a Wi-Fi network using the Wi-Fi menu in the menu bar. Alternatively, attach a network cable to your Mac.
After your Mac activates, click Exit to Recovery Utilities, then select Reinstall macOS in the utilities window and follow the onscreen instructions to reinstall macOS.