 Finding a reliable backup solution for the Mac that runs in the background and isn't a drain on system resources was once considered a challenging prospect.
With the arrival of OS X 10.5 Leopard, Apple changed that preconception by introducing its native backup solution, called Time Machine. This article explains the benefits of using Time Machine and runs you through the setup and restore process.
Benefits of Using Time Machine
Time Machine has won over many Mac users due to its automated scheduling and intuitive recovery process, along with its ability to run in the background without affecting overall system performance.
The application achieves this by making an initial full backup of your Mac's system disk and then stacking subsequent changes to the volume in a chronological hierarchy. Hourly backups, daily backups and weekly backups occur automatically, while the oldest backups are overwritten with new ones as the external backup disk reaches full capacity.
This creates a layered snapshot system that's reflected in Time Machine's navigable timeline and makes the recovery of individual files and folders a simple affair.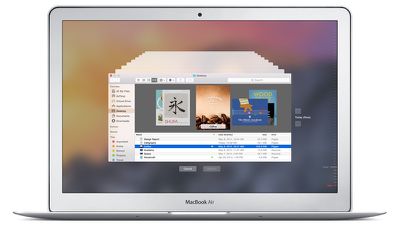
Another big plus with Apple's solution is that a Time Machine backup can be used in Recovery Mode to restore your Mac to its original state if the worst happens and your drive fails.
Likewise, the same backup volume can be used by Apple's Migration Assistant during an OS X installation to quickly transfer your applications, files and settings from an old Mac to a new one.
If you're using a Mac notebook running OS X Lion or later and you move away from the backup disk, Time Machine will save daily backups to your Mac's startup disk and even manage these local snapshots to ensure you still have storage space available.
What You Need
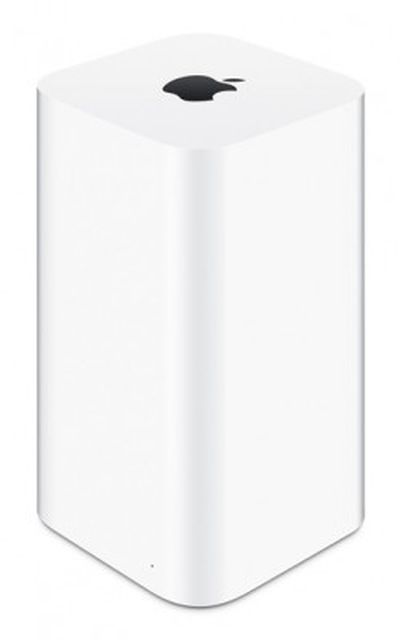
Apple's AirPort Time Capsule (from $299) is a Wi-Fi base station with a built-in backup disk, making it an ideal wireless solution for Time Machine since it avoids the need to keep an external hard drive physically connected to your Mac.
You can also use an external drive connected over a network, so long as it supports Apple File Protocol (AFP) file sharing. Otherwise, any hard drive that connects via USB, Thunderbolt or FireWire and uses a Mac filesystem format will do the job.
Bear in mind that the initial backup takes time, so you may want to set up Time Machine in the evening and leave your Mac on overnight for the process to complete.
Setting up Time Machine
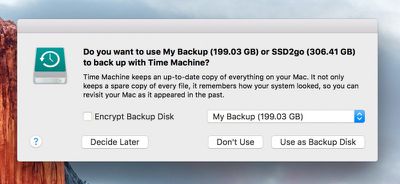
When you connect an external hard drive to your Mac, a prompt may appear asking if you want to use it as a Time Machine backup disk. If you'd prefer to secure your backups with a password, check the "Encrypt Backup Disk" option, then click "Use as Backup Disk".
If the dialog prompt doesn't appear, follow these steps:
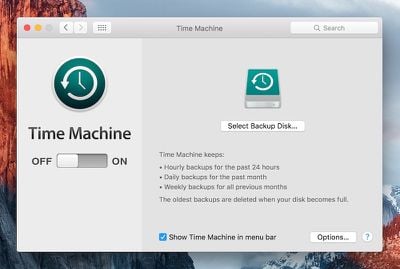
- Open Time Machine's settings by selecting System Preferences from the top-left Apple menu in the menu bar and clicking the Time Machine icon in the preference pane.
- Turn on the Time Machine slider and tick the "Show Time Machine in menu bar" option if it isn't already selected.
- To exclude specific items from your backups, click "Options…" and use the + button to select the files or folders in question. Here you can also choose whether to back up when your Mac's running on battery power and whether or not to be notified when old backups get deleted. Click Save when you're done.
- Click "Select Backup Disk…" and choose the drive you'd like to use from the list. Finally, tick the box if you want to Encrypt backups and then click "Use Disk".
And that's it. The chosen volume will be formatted and the initial backup begins a couple of minutes later. Time Machine looks after the rest.
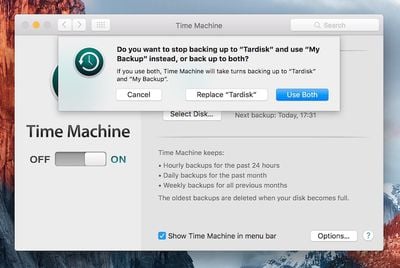
Using Multiple Backup Disks
Of course, using one backup disk may prove impractical if you often move your Mac between two locations. Fortunately, Time Machine supports multiple backups and will automatically rotate backups between disks, so there's nothing to stop you from keeping one in both places.
To add another backup disk to Time Machine, simply wait for the initial backup to complete on the first disk and then repeat step 4. Time Machine will ask if you want to use this new volume instead or to take turns backing up between the two disks. Select "Use Both".
Restoring From a Backup
To restore individual files and folders from your desktop, follow these steps:
- Enter Time Machine by selecting the option from the Time Machine icon on the OS X menu bar.
- In the screen that appears you'll see a Finder window and several more receding into the distance; select a date from the timeline right of the screen or click the up/down arrows to navigate the backup snapshots and locate the deleted item (or an earlier version of an item) you want to recover.
- Select the relevant item in the snapshot window, click Restore, and Time Machine will copy the file or folder to its original location on your Mac's startup disk.
If you're using multiple backup disks and want to restore an item from another backup volume, return to the desktop, hold down the Option key and click on the Time Machine icon in the menu bar. Select the option that appears to "Browse Other Backup Disks…" and choose the attached volume in question.
Finally, to restore your startup disk wholesale in the event of a disaster, restart your Mac and hold down the Command and R keys to enter Recovery Mode. Select the option to "Restore your Mac from a Time Machine backup" from the OS X Utilities window and follow the steps on screen.
Alternatives to Time Machine
If you'd prefer more scheduling flexibility than Time Machine offers or you want to back up to a bootable clone disk, check out third-party apps like SuperDuper! ($27.95) and Carbon Copy Cloner ($39.99).
Alternatively, CrashPlan offers a free off-site backup solution as well as a cloud-based option for as little as $5 a month.


Top Rated Comments
Thank you!
Well written article. Thank you.
Best practice for backups is to have at least 3 copies of your data with one of those copies being off-site.