Apple's latest iPhones include several headline camera features that are worth using, such as Portrait Mode and Photographic Styles. But if all you want to use is the standard photo mode, there are still several tools and settings that can improve the composition of your pictures and help you capture the perfect shot using more traditional techniques.
Whether you are the owner of a new iPhone or a longtime user looking to up your photography game, here are six camera tools and settings in iOS that are worth checking out and experimenting with.
1. Use the Rule of Thirds
For a while now, Apple's Camera app has included a few optional settings that can help you line up your shots. Foremost in these settings is the Grid tool, which should be used when applying the rule of thirds. It divides the frame of your photo into a grid with two horizontal lines and two vertical lines, creating nine equal parts.
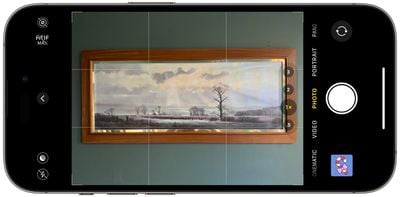
The rule of thirds helps guide the viewer's eye to the most important parts of your photo and creates a more harmonious composition. Here's how to overlay a grid on the viewfinder.
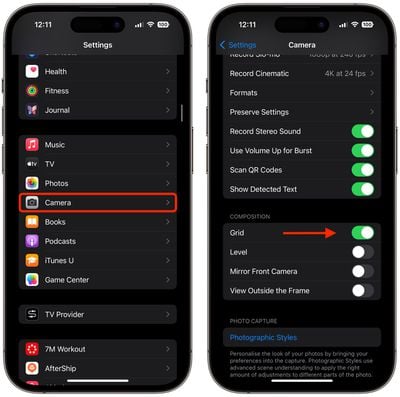
- Open the Settings app on your iPhone.
- Scroll down and tap Camera.
- In the "Composition" section, toggle on the switch next to Grid.
Here are five things to keep in mind when using the grid to apple the rule of thirds.
- Identify the Key Elements: First, identify the main subjects or elements in the scene you want to photograph. These could be a person, a building, a tree, or any focal point.
- Positioning the Subjects: Place these key elements along the lines or at the points where the lines intersect. For instance, if you're taking a photo of a person, you might position them along one of the vertical lines, rather than in the center of the frame.
- Horizontal Elements: For horizontal elements like the horizon in a landscape, align them with one of the horizontal lines. For a more dramatic sky, place the horizon on the lower line. For more emphasis on the land or sea, place it on the upper line.
- Balancing the Image: Use the rule of thirds to balance your photo. If you place a subject on the left, consider having something of lesser importance on the right to create a sense of balance.
- Experimentation: While the rule of thirds is a guideline, it's not a strict rule. Feel free to experiment with it and see how shifting elements in your frame changes the photo's impact.
2. Straighten Top-Down Shots
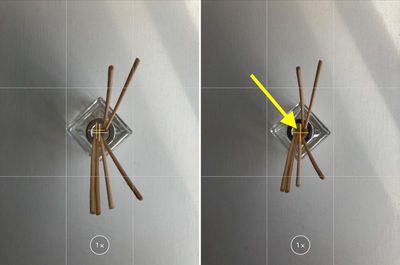
If you're taking a picture of something from above like a plate of food or an ornament on the ground, consider using the camera level, as it helps you capture a balanced shot without having to use a tripod arm or mount. It's also useful for taking a shot of something directly above you, like an object on the ceiling or in the sky.
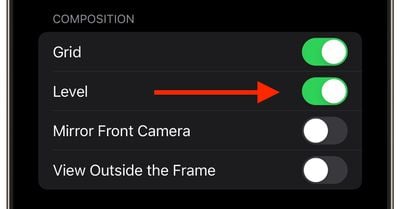
The camera level tool used to be part of the Grid overlay, but Apple separated out the function in iOS 17, and it now has its own switch: Open the Settings app on your iPhone, select Camera, then toggle on the switch next to Level. Now you are ready to use it.
- Open the Camera app, and set the capture mode to Photo, Portrait, Square, or Time Lapse, using the sliding menu above the shutter button.
- Point the camera straight down above your subject (or straight up if the subject/scene you want to capture is above you).
- Line up the floating crosshair with the fixed crosshair in the center of the screen by adjusting the angle of your phone's camera. The crosshairs will both glow yellow when in perfect alignment.
- Tap the shutter button to capture the shot.
3. Straighten Your Horizontal Shots
By making the Level tool an individual option in iOS 17, Apple has also included an additional horizontal level for more traditional straight-on photos.

Turning the Level option on makes a broken horizontal line appear on the screen when your iPhone senses that you're lining up for a straight-on shot and you tilt your device slightly out of horizontal. The line appears white while your phone is out of level and then turns yellow once you achieve a level orientation to indicate success.

With the Level setting enabled (Settings ➝ Camera ➝ Level), try it for yourself. Open the Camera app and try shooting a subject at a straight angle, and you should see the broken horizontal lines in the center of the viewfinder. Straighten your angle up to connect the lines and make a single yellow line.
The leveling pop-up only appears briefly and only within a narrow range of angles close to horizontal (in either portrait or landscape orientation), so it won't intrusively pop up when you're intentionally trying to take a photo at an angle.
4. Take Burst Photos
Burst Mode refers to when the camera on your iPhone captures a series of photos in rapid succession, at a rate of ten frames per second. It's a great way to shoot an action scene or an unexpected event, since you're always more likely to end up with the picture you were aiming for.
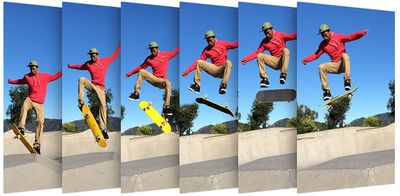
To shoot in Burst Mode, go to Settings ➝ Camera and toggle on Use Volume Up for Burst, then simply long press on the Volume Up button when in the Camera app, and your iPhone will take a series of photos in quick succession. Notice that a counter increases inside the on-screen shutter button for as long as you hold down the volume button. This indicates how many shots are being captured in the current burst. Simply take your finger off the volume when you want to end the burst of shots.
When you take a series of burst photos, they automatically appear in the Photos app under the Album name Bursts. You'll also find them in your main Photo Library. Follow the link to learn how to view and select the best of your Burst photos in the Photos app.
5. Mirror Your Selfies
When you take a selfie with your iPhone using the Camera app, it automatically flips – or mirrors – the image so that it's an inverted version of the mirror image you see in the preview before you take the shot.
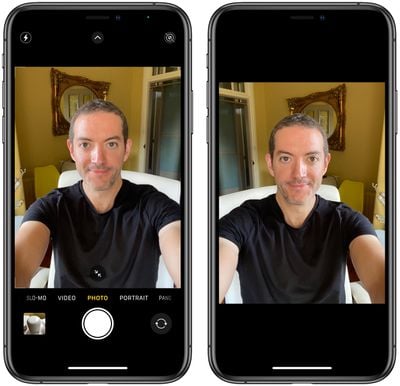
This can look odd, since it makes a big difference to how selfies look. It can also be annoying, since most third-party social media apps automatically take mirrored selfies, which means you're more likely to be used to the mirroring functionality than the flipped selfies that your iPhone takes.
Fortunately, you can change this default behavior of the Camera app, meaning that you can get the mirrored selfie you're probably more accustomed to seeing. Here's how.
- Launch the Settings app, then scroll down and select Camera.
- Toggle the switch next to Mirror Front Camera to the green ON position.
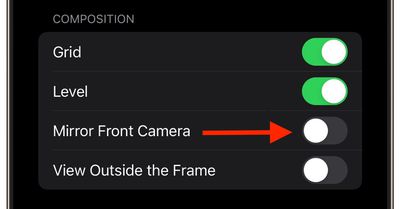
That's all there is to it. From now on when you use the Camera app to shoot a selfie, you'll capture the same shot that you saw in the app's preview mode.
6. View Outside the Frame
On iPhone 11 and later models, there is an optional camera setting that allows you to see what is outside the bounds of your photo's frame, so you can correct the alignment of photos (and videos) without having to resort to cropping.
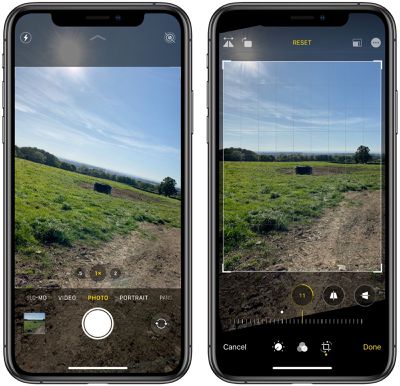
With the "View Outside the Frame" setting enabled, using the wide lens or the telephoto lens, the camera will simultaneously show you the lens view using the next widest sensor. So the wide lens is active when you view with the telephoto lens, and the ultra-wide is active when the wide lens is selected.
- Open the Settings app.
- Scroll down and tap Camera.
- Under the "Composition" section, toggle on the switch next to View Outside the Frame.
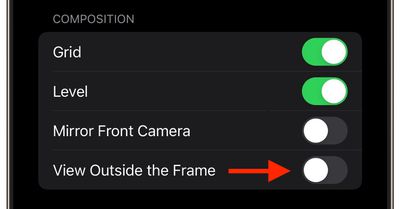
You may have to play around with zoom levels to switch between lenses, but you'll know the feature is active when the camera interface turns semi-transparent to reveal the surroundings outside of the viewfinder.


