Every new release of macOS comes with its share of undetected bugs, but most early adopters will tell you that Catalina has had more than most.
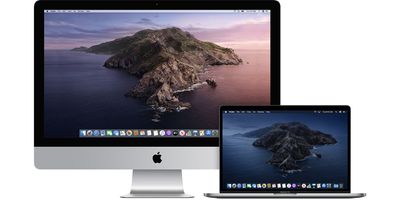
One way of avoiding a disastrous upgrade to Apple's latest version of macOS is to partition your Mac's hard drive and install Catalina alongside your current operating system. That way, you can test out the apps that are most crucial to your daily workflow without risking your system's existing setup, not to mention your personal data.
Of course, it's not just Catalina that you can install on a separate partition – the associated steps below can be used to run any operating system alongside macOS. Keep reading to learn how it works.
What is a Disk Partition?
Partitioning your Mac divides the available hard drive space into individual sections, each of which acts as a separate volume that you can use to run two separate operating systems on the same computer. It's the same procedure that Apple's Boot Camp Assistant runs to let you install Windows alongside macOS, but whereas that creates the partition for you, here we're going to show you how to partition your drive manually.
But before you install macOS Catalina on a separate partition, it's worth familiarizing yourself with the way Apple's new file system works.
Catalina's File System Explained
Catalina is the first version of macOS to adopt wholesale the relatively new Apple File System (APFS), which is optimized for the flash storage used in recent Macs. Aside from introducing a bunch of other new technical features, an APFS-formatted partition uses a space-sharing "container" that can house multiple secure "volumes" or file systems. This allows the partition's free space to be shared on demand and allocated to any of the individual volumes in the container as required.
Catalina is installed on a dedicated read-only system volume, while your files and data are stored separately in another volume labelled with the suffix "- Data." The idea behind this setup is that it helps prevent the accidental overwriting of critical operating system files, since the user can no longer alter data or store files on the read-only system volume. In practice, the average user shouldn't notice any difference after the split, since both volumes appear in Finder as a single unified volume.
Remember to Back Up First
Before following these steps, ensure you have made a full backup of your system, which should be par for the course when making structural changes to your Mac's system drive. MacRumors cannot be held responsible for any data loss.
How to Create a New Partition on Your Mac
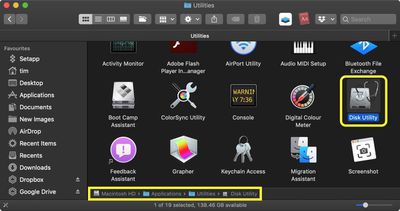
- Open a Finder window on your Mac and open the Applications folder.
- Scroll down and open the Utilities folder.
- Launch Disk Utility.

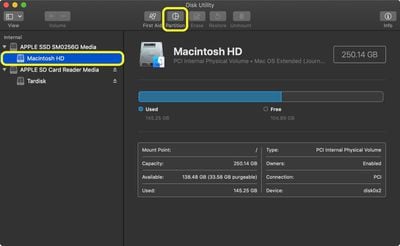
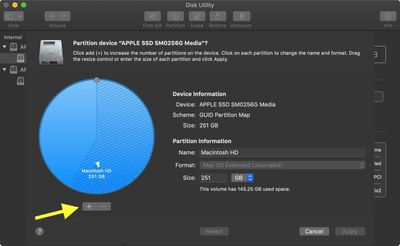
- Select your hard drive from the sidebar in the Disk Utility window (it's usually called "Macintosh HD"), and then look at the blue bar to check that you have enough space to create a new partition – around 50GB should suffice, but the more the better.
- Click the Partition tab.
- Click the plus (+) button below the pie chart.
- In the Name: field, type a name for your new partition.
- In the Format: field, use the dropdown to select a Format for the new partition. If you're running macOS High Sierra, choose APFS. If you are running macOS Sierra or earlier, choose Mac OS Extended – Catalina will convert it to APFS automatically during the installation process.
- In the Size: field, enter the size in gigabytes that you'd like your new partition to be. Alternatively, using the ball on the edge of the pie chart, drag the radial line to adjust the size of the new partition.
- Click Apply.
- Check the summary of proposed actions, then click Partition to confirm.
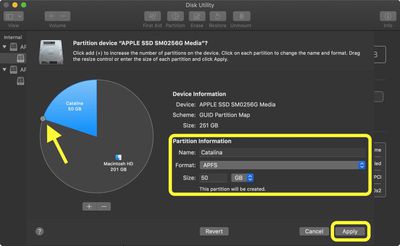
If everything goes well, Disk Utility will create the partition in just a few minutes. When the boot volume is resizing, your Mac's screen may freeze for a while. This is expected behavior – whatever you do, do not power off your computer while the resizing takes place.
How to Download Catalina
The method for installing Catalina on your new partition will depend on the version of macOS you're currently using. If you're running macOS 10.14 Mojave, you can download Catalina via Software Update. If you're running macOS 10.13 High Sierra or an older version you will need to download Catalina from the Mac App Store.
Download Catalina via Software Update
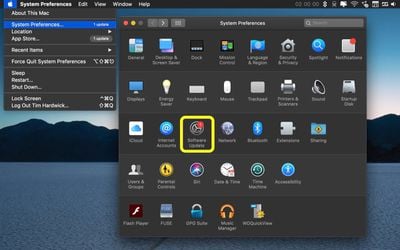
- Launch System Preferences from your Mac's Dock, from the Applications folder, or from the Apple menu bar ( -> System Preferences...).
- Click Software Update.
- Your Mac will check for updates and show that macOS 10.15 Catalina is available. Click Update Now to download the installer.
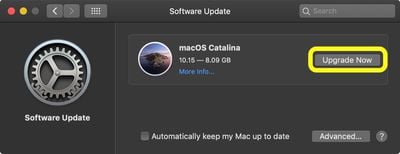
Be prepared to wait while the installer downloads. It can sometimes take several hours, but you can continue to use your Mac while it continues to download in the background.
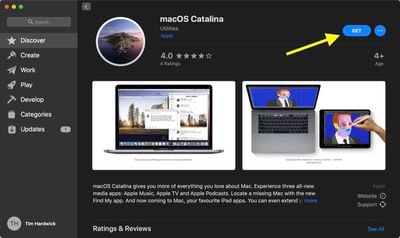
Download Catalina via the Mac App Store
- Launch the Mac App Store from the Applications folder.
- Search for macOS, or go straight to the Catalina download page.
- Click Get.
- Enter your Apple ID and password if prompted.
Be prepared to wait while the installer downloads. It can sometimes take several hours, but you can continue to use your Mac while it continues to download in the background.
How to Install Catalina on Your New Partition
Once the Catalina installer has downloaded, it should launch automatically. After accepting the T&Cs, be sure to select the new partition on which you want to install Catalina.
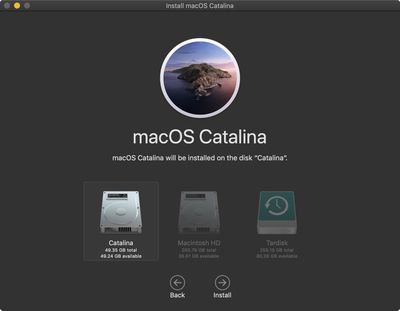
Follow any other onscreen instructions and allow the installer to restart your Mac and complete the installation.
How to Switch Between Partitions
If you're already booted into macOS, you can reboot from another drive or partition by following these steps.
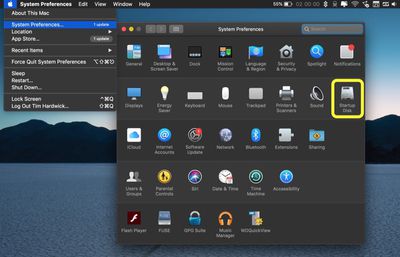
- Launch System Preferences from your Mac's Dock, from the Applications folder, or from the Apple menu bar ( -> System Preferences...).
- Click Startup Disk.
- Click the lock icon in the bottom-left corner of the window to allow you to make changes.
- Enter your system admin password, then click OK.
- Select the partition drive you want to boot from on restart.
- Click Restart....
When powering on your Mac from scratch, hold the Option key when you hear the startup chime. This will activate the Startup Manager, where you can select which partition to boot from.