In macOS, the Dock provides convenient one-click access to your most frequently used Mac applications. The simplest way to organize docked apps is to click and drag them into your preferred place, but here we're going to show you a lesser-known trick for arranging docked items more clearly.
To relate certain types of apps and add an extra visual clue to their location in the Dock, try inserting some spaces. Using this method, you could separate out other apps from, say, conversion tools that you frequently drag and drop files onto. Keep reading to learn how it's done.
How to Insert Spaces into the macOS Dock
- Launch the Terminal app found in Applications/Utilities. (To quickly open the Utilities folder in Finder, select Go -> Utilities from the menu bar, or use the key shortcut Shift-Command-U.)
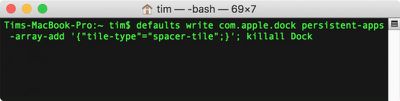
- At the Terminal prompt, type the following command and press Enter: defaults write com.apple.dock persistent-apps -array-add '{"tile-type"="spacer-tile";}'; killall Dock

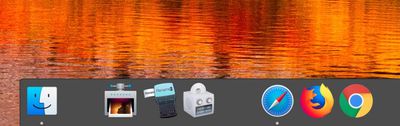
- Your Dock will reboot with a single space added to it. Click and drag the space to your desired location, just like a regular app icon.
- Repeat the Terminal command above to insert additional spaces and arrange them in your Dock to suit.

To remove a space from your Dock simply right-click (or Ctrl-click) it and select Remove from Dock. Alternatively, click and drag the space out of the Dock then let go of the mouse button to delete it.


Top Rated Comments
An example with both widths:
To add them to the documents side instead of the apps side, use the key persistent-others instead of persistent-apps (found on Lifewire ('https://www.lifewire.com/add-custom-and-standard-doc-spacers-to-mac-2260861')).
defaults write com.apple.dock persistent-apps -array-add '{"tile-type"="flex-spacer-tile";}'