![]() In iOS 13, Apple has enhanced the built-in photo and video editing capabilities available to iPhone and iPad users, and for the first time it has made many of its stock photo adjustment tools available for editing videos.
In iOS 13, Apple has enhanced the built-in photo and video editing capabilities available to iPhone and iPad users, and for the first time it has made many of its stock photo adjustment tools available for editing videos.
In addition to the new video editing options, Apple has introduced a new tool selection interface that makes the whole process quicker and easier than ever before. Let's take a look at how it works.
Launch the stock Photos app on your iPhone or iPad and select a video clip from your Photo library using the Photos tab. If it isn't a recent video that you want to edit, use the Days, Months, and Years views to whittle down your collection, or select a clip from one of your albums via the Albums tab.
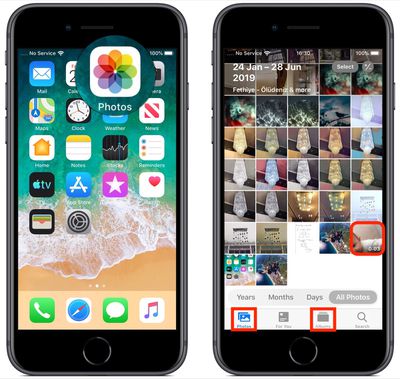
Once you've selected a video, tap Edit in the top-right corner of the screen. When the black-bordered editing interface appears, you'll notice four icons between the Cancel and Done options at the bottom of the screen.
Trimming a Video
The first film camera-shaped icon is the default selection, and gives you quick access to the timeline. The timeline appears below the video, and you can use it to scrub through a clip or trim it.
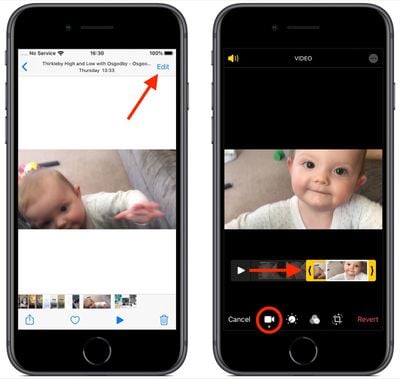
To trim the clip, drag the yellow chevrons to include the portion you wish to keep – anything outside the yellow frame will be discarded when you tap Done.
Adjustment Tools
The next option in the row of icons at the bottom of the editing interface looks like a control knob. Tapping this opens the Adjust tools in a horizontal strip below your video. Tap Auto – the first tool in the strip – and you'll notice the horizontal dial light up below the toolset.
Auto uses intelligent algorithms to optimally tune the other tools and enhance your video, but you can manually adjust its intensity level by moving the dial with a swipe of your finger. You can easily return to the auto-tuned level by returning the dial back to the white dot.
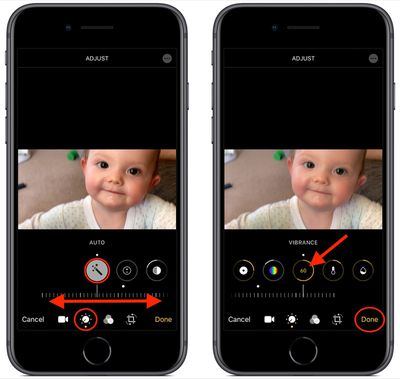
Swipe along the strip of other tools and you'll find that they all work similarly. The only difference is that when you swipe along the dial to change the adjustment level, the selected tool's icon will display a number that you can use as a reference to refine the effect you're previewing.
The other adjustment tools available in the horizontal strip include Exposure, Highlights, Shadows, Contrast, Brightness, Black Point, Saturation, Vibrance, Warmth, Tint, Sharpness, Definition, Noise Reduction, and Vignette. Simply tap Done when you're happy to apply and save your adjustments.
The Filters Tool
The third option in the row of icons along the bottom of the editing interface looks like a Venn diagram. Tapping this icon opens the Filters tool, which allows you to apply an Instagram-style filter to your captured videos in just a few quick taps.
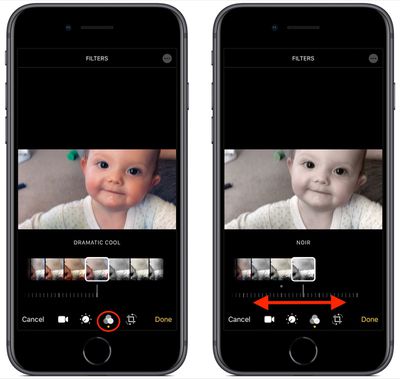
Swipe through the nine available filters to get a preview of how your video looks when each one is applied. Let your finger come to a rest, and a horizontal dial will appear below the selected filter.
Use you finger to move the dial and adjust the intensity level of the filter. Tap Done in the bottom right of the screen to apply the filter effect to your video.
Cropping Tools
The fourth and final icon at the bottom of the editing interface opens the cropping tools. You can easily crop a video using the grid overlay that appears by dragging at its corners, just like you would for photos.
Notice that you also now have a row of three additional adjustment tools associated with the dial below them. From left to right, these allow you to straighten the video, adjust its vertical alignment, and adjust its horizontal alignment.
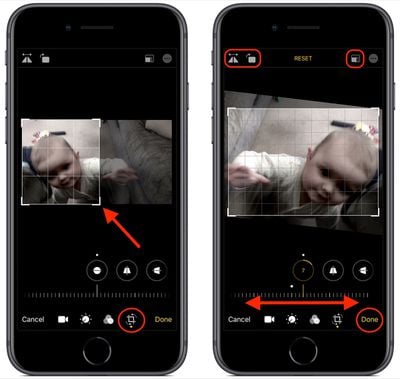
Tap one of the tools and move the dial with a swipe of your finger to adjust to the desired level, indicated by the number in the selected icon.
Running along the top of the video editing interface you'll notice more tools to flip and rotate the video on the left, and apply preset crop ratios on the right. You can tap the Reset button between these tools to undo your adjustments, or press Done if you're happy with your edits.
Lastly, it's worth remembering that you can access all of these editing tools whenever you capture video using the built-in Camera app – you don't even have to unlock your device to use them on the clip you just shot.