Apple's Continuity Camera feature in macOS Mojave and later allows you to use your iPhone or iPad like a camera extension for your Mac. In other words, you can use your iOS device to scan documents or take a photo of something nearby, and it will appear instantly on your Mac.
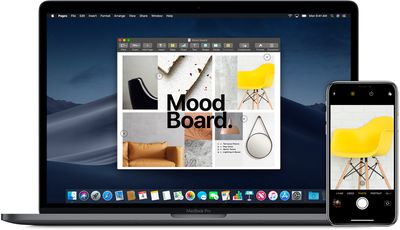
Continuity Camera works in many Mac apps, including Finder, Preview, Notes, Mail, Messages, TextEdit, Keynote, Numbers, and Pages.
Note that for the feature to work, your Mac and iOS device need to have Wi-Fi and Bluetooth turned on, and they both need to be signed into iCloud with the same Apple ID.
How to Take a Photo With Continuity Camera
- Open one of the apps mentioned above on your Mac.
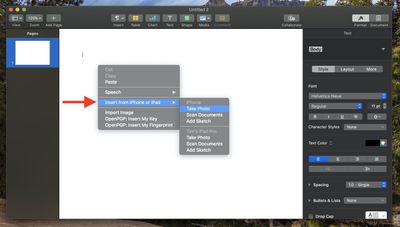
- Right-click (Ctrl-click) in the document or window where you want your photo to appear, or click the File or Insert menu in the menu bar.
- Select Import from iPhone or iPad -> Take Photo. This will open the camera app on your iPhone or iPad.

- On your iPhone or iPad, tap the shutter button to take a photo, then tap Use Photo.
Your photo will automatically appear in the document or window on your Mac.
Tip: To take a photo using Continuity Camera in Finder, open a Finder window and click the cog icon, or right-click (Ctrl-click) on the Desktop or window where you want your photo to appear. Then choose Import from iPhone or iPad -> Take Photo.
How to Scan Documents With Continuity Camera
- Open one of the apps mentioned above on your Mac.
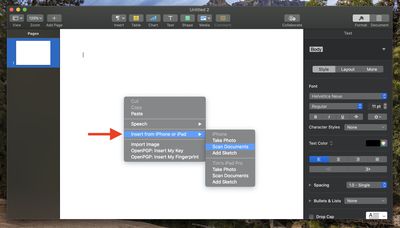
- Right-click (Ctrl-click) in the document or window where you want your scanned document to appear, or click the File or Insert menu in the menu bar.
- Select Import from iPhone or iPad -> Scan Documents. This will open the camera app on your iPhone or iPad.
- Place your document in view of the camera on your iOS device, then wait for the scan to complete automatically. If you need to manually capture the scan, tap the shutter button or one of the volume buttons.
- Tap Keep Scan.
- Take additional scans of the document, or tap Save when you're finished.
Your scans will automatically appear as a PDF file in the document or window on your Mac.
Tip: To scan documents using Continuity Camera in Finder, open a Finder window and click the cog icon, or right-click (Ctrl-click) on the Desktop or window where you want your scanned document to appear. Then choose Import from iPhone or iPad -> Scan Documents.