finder padlockIn macOS Mojave, you can choose to encrypt and decrypt disks on the fly right from the desktop. Using this convenient Finder option, we're going to show you how to encrypt a USB flash drive (or "thumb drive"), which is useful if you're traveling light and want to take sensitive data with you for use on another Mac.

Finder uses XTS-AES encryption, the same encryption that FileVault 2 uses to prevent access to data on a Mac's startup disk without a password. Note that the following method is only compatible with Macs – you won't be able to access data on the encrypted drive using a Windows machine.

If this is a requirement, you'll need to use a third-party encryption solution like VeraCrypt. With that in mind, here's how to securely encrypt your USB flash drive.
how to encrypt a usb stick in macos mojave 01
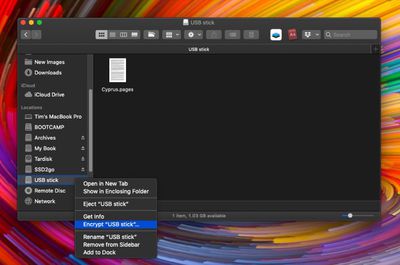
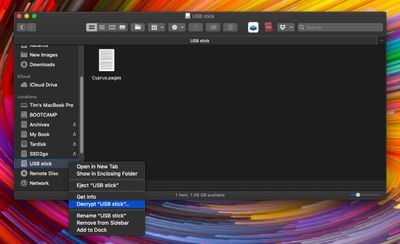
Attach the USB flash drive to your Mac and locate its disk icon on your desktop, in a Finder window, or in the Finder sidebar, then right-click (or Ctrl-click) it and select Encrypt "[USB stick name]"... from the contextual menu.

(Note that if you don't see the Encrypt option in the dropdown menu, your USB flash drive hasn't been formatted with a GUID partition map. To resolve this, you'll need to erase and encrypt the USB drive in Disk Utility – before that though, copy any data on the drive to another location for temporary safekeeping.)
how to encrypt a usb stick in macos mojave 02
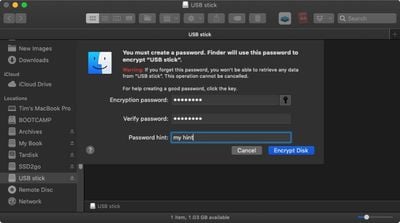
When you select Encrypt, Finder will prompt you to create a password, which you'll need to enter the next time you attach the USB flash drive to a Mac. (Don't forget this, otherwise you'll lose access to any data stored on the USB drive!) Once you've chosen a password, verify it, add a meaningful hint if desired, and click Encrypt Disk.

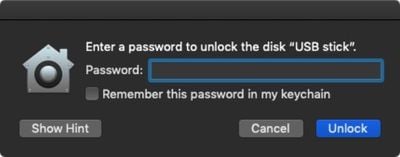
The encryption process depends on how much data you have on the USB flash drive, but you'll know it's completed when its disk icon disappears and re-mounts. You'll now be able to access the contents of the USB flash drive as usual, but if you physically detach it and re-attach it to your Mac you'll be prompted to enter the password.
how to encrypt a usb stick in macos mojave 03
Note that the prompt includes an option for macOS to remember this password in my keychain. Check the box, and whenever you attach the USB stick to your Mac again you won't be prompted to enter the password and you'll have automatic access to it, just like any other drive.
how to encrypt a usb stick in macos mojave 03b
If you ever want to decrypt the USB flash drive in future, right-click (or Ctrl-click) its disk icon, select Decrypt "[USB stick name]" from the contextual menu, and enter the password to turn off encryption protection.

How to Encrypt a USB Flash Drive in Disk Utility

Before proceeding, make sure you've copied any data on the USB flash drive to a safe location, like your Mac's internal disk.

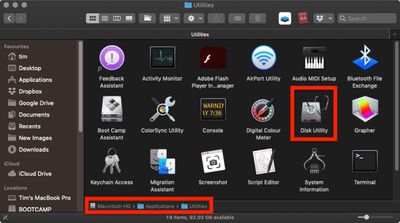
  1. Launch Disk Utility, located on your Mac in Applications/Utilities.
    how to encrypt a usb stick in macos mojave 04

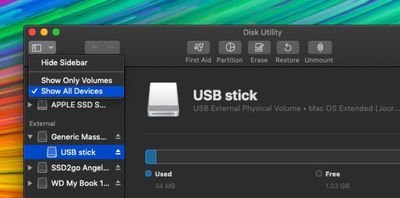
  2. In the Disk Utility toolbar, click the View button and select Show All Devices if it isn't already ticked.
    how to encrypt a usb stick in macos mojave 05

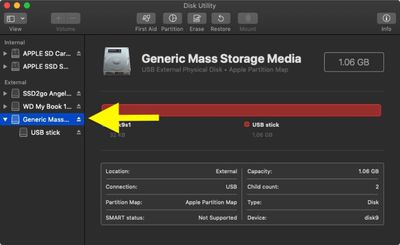
  3. Select your USB flash drive in the sidebar by clicking its top-level device name (i.e. not the volume name that's listed beneath it).
    how to encrypt a usb stick in macos mojave 06

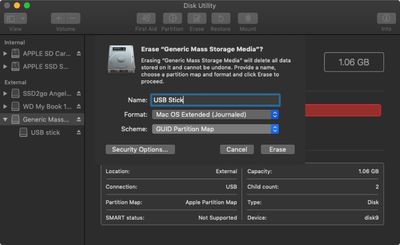
  4. Click the Erase button in the toolbar.
  5. Give the USB flash drive a name.
  6. Next, click the Scheme dropdown menu and select GUID Partition Map. (It's important to do this first before the next step, otherwise you won't see the encryption option in the Format dropdown.)
    how to encrypt a usb stick in macos mojave 07

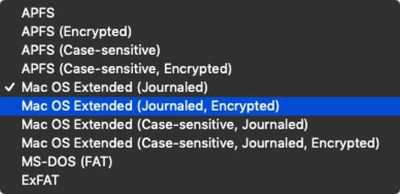
  7. Now click the Format dropdown menu and select Mac OS Extended (Journaled, Encrypted).
    how to encrypt a usb stick in macos mojave 08

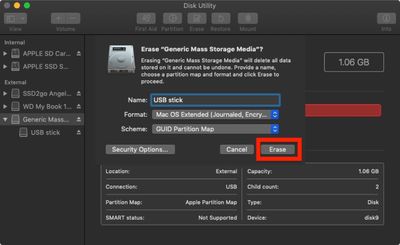
  8. Click Erase.
    how to encrypt a usb stick in macos mojave 07

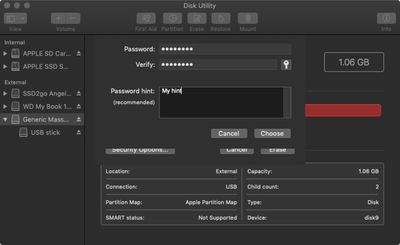
  9. Enter your new password, enter it once more to verify, include a password hint if desired, then click Choose.
    how to encrypt a usb stick in macos mojave 09

  10. Click Erase once again, and wait for your disk to be formatted and encrypted.
    how to encrypt a usb stick in macos mojave 10

Once the process is complete, copy across your sensitive data to the blank USB flash drive, where it will be automatically encrypted and secured with a password.

Top Rated Comments

Fedelix Avatar
70 months ago
Using Dark Mode for screenshots isn‘t a good choice for tutorials.

I‘m sorry!
Score: 13 Votes (Like | Disagree)
David G. Avatar
70 months ago
Disagree. It’s an official feature in Mojave and one can still follow the exact same options despite it being in dark mode.
It’s not that the process is different. It’s that black text on a white background is easier to read. Heck, some of the text is grey on black; how in the world could that ever be seen as anything close to desirable for tutorials for the masses? With my vision I’m having difficulty reading it. Let what’s stood the test of time be displayed for the vast majority, and run dark mode on your own machine on your own time.
Score: 6 Votes (Like | Disagree)
Kole Avatar
70 months ago
Using Dark Mode for screenshots isn‘t a good choice for tutorials.

I‘m sorry!
Disagree. It’s an official feature in Mojave and one can still follow the exact same options despite it being in dark mode.
Score: 5 Votes (Like | Disagree)
nate13 Avatar
70 months ago
Using Dark Mode for screenshots isn‘t a good choice for tutorials.

I‘m sorry!
Exactly why I came to comment. In a dark environment, with dark surroundings, I believe dark mode is awesome. In a bright context (mac rumors home page for example), its just terrible. MR editors take note!!
Score: 3 Votes (Like | Disagree)
Weaselboy Avatar
66 months ago
Thank you,

There is no "scheme dropdown" option as it is possible to see on the image I uploaded above. :(


Make sure you have enables show all devices, then select the drive itself like in my photo and not one of the volumes below it.

Attachment Image
Score: 2 Votes (Like | Disagree)
Weaselboy Avatar
70 months ago
Is there a way to force this to back up to iCloud?
Thanks
I played around with it, and it looks like you can copy the entry from the login Keychain and paste it into the iCloud Keychain. But instead of keeping the drive name, it changes it to the UUID # of the drive.


Here is the login Keychain entry.


I right clicked and copied it from login then right clicked and pasted in iCloud Keychain and it made the new entry you see here in the iCloud Keychain. Presumably this would sync along with everything else in the iCloud Keychain.

I have not tested if you delete this entry from login Keychain if this iCloud entry will unlock the drive.

Attachment Image

Attachment Image
Score: 2 Votes (Like | Disagree)

Popular Stories

Delta Feature

Delta Game Emulator Now Available From App Store on iPhone

Wednesday April 17, 2024 9:58 am PDT by
Game emulator apps have come and gone since Apple announced App Store support for them on April 5, but now popular game emulator Delta from developer Riley Testut is available for download. Testut is known as the developer behind GBA4iOS, an open-source emulator that was available for a brief time more than a decade ago. GBA4iOS led to Delta, an emulator that has been available outside of...
iPhone 15 Pro Action Button Translate

All iPhone 16 Models to Feature Action Button, But Usefulness Debated

Tuesday April 16, 2024 6:54 am PDT by
Last September, Apple's iPhone 15 Pro models debuted with a new customizable Action button, offering faster access to a handful of functions, as well as the ability to assign Shortcuts. Apple is poised to include the feature on all upcoming iPhone 16 models, so we asked iPhone 15 Pro users what their experience has been with the additional button so far. The Action button replaces the switch ...
Provenance Emulator

PlayStation, GameCube, Wii, and SEGA Emulator for iPhone and Apple TV Coming to App Store

Friday April 19, 2024 8:29 am PDT by
The lead developer of the multi-emulator app Provenance has told iMore that his team is working towards releasing the app on the App Store, but he did not provide a timeframe. Provenance is a frontend for many existing emulators, and it would allow iPhone and Apple TV users to emulate games released for a wide variety of classic game consoles, including the original PlayStation, GameCube, Wii,...
maxresdefault

Hands-On With the New App Store Delta Game Emulator

Wednesday April 17, 2024 12:19 pm PDT by
A decade ago, developer Riley Testut released the GBA4iOS emulator for iOS, and since it was against the rules at the time, Apple put a stop to downloads. Emulators have been a violation of the App Store rules for years, but that changed on April 5 when Apple suddenly reversed course and said that it was allowing retro game emulators on the App Store. Subscribe to the MacRumors YouTube channel ...
iOS NES Emulator Bimmy Feature

NES Emulator for iPhone and iPad Now Available on App Store [Removed]

Tuesday April 16, 2024 11:33 am PDT by
The first approved Nintendo Entertainment System (NES) emulator for the iPhone and iPad was made available on the App Store today following Apple's rule change. The emulator is called Bimmy, and it was developed by Tom Salvo. On the App Store, Bimmy is described as a tool for testing and playing public domain/"homebrew" games created for the NES, but the app allows you to load ROMs for any...